The Good Husband and I recently bought a house and having our own piece of borrowed Earth, has made us more conscientious of how we treat her.
See, I have always had hippy tendencies but TGH does what he does because he is cheap. When he suggests things that are crunchy, hippy type things, I know he is doing it with the main goal of saving money. This is why he suggested cloth diapering The Good Baby. It wasn't about the environmental concerns, it was about keeping more green in his wallet.
So hippy and cheap make for quite a pair.
I have composed a list of green/cheap things we do and separated them into several different categories. Most of these things save money in the long term but might be a little costly upfront.
This first post is about the things you can do on the outside of your house and with the materials on the inside. TGH and I were lucky enough to build our own house so some of the things, like choosing what building materials and appliances to buy, was easier for us since we were buying everything together. It might be easier for you to slowly replace appliances and materials over time.
Everything on the list is something that we currently do or are preparing to do in the future.
If you have any questions, feel free to email me and I will answer you as best I can, keeping in mind I am no expert, just A Good Wife.
Inside
~ Use green flooring options like carpet with no or low VOC and hardwood floors from sustainably managed forests. More information here: http://www.coopamerica.org/pubs/realmoney/articles/flooring.cfm
~Use low or no VOC paint: http://www.eartheasy.com/live_nontoxic_paints.htm
~Buy Energy Star appliances: http://www.energystar.gov/
~Have blown cellulous insulation installed: http://www.associatedcontent.com/article/1515640/cellulose_insulation_environmentally.html
~Use a programmable thermostat and adjust it during the day. During the day in fall and winter, we keep the thermostat at 65 during the day and turn it down to 60 at night. During the summer, we keep the thermostat at 82 during the day, 78 when we are home and 75 at night.
~Use fans and keep the windows open to delay the use of the air conditioner or furnace.
~Buy thermal curtains to help insulate your house.
~Use a power strip and unplug the strip when you are not using any of the appliances
~Switch to CFL light blubs (DO NOT throw these in the regular garage!)
~Save old batteries, medicines, CFLs, motor oil and look for recycling programs that will accept them. My city has an annual Household Hazardous Waste Collection that accepts all these items and more.
~Check out places like GoodWill, The Salvation Army and http://www.freecycle.com/ for used furniture (slipcovers go a long way)
~Use a low flow shower head
~Place bricks in the back of your toilet tank to use less water
Outside
~Start a garden
~Start a compost pile
~Plant shade trees to help shelter your home from the weather
~Build or buy a rain barrel
~Use a manual lawn mower: http://www.cleanairgardening.com/reelmowers.html
~Use native plants and trees when landscaping
~Use solar powdered lights to light sidewalks and driveways
~Install a sensor to your outside house lights that will turn the lights off automatically when it is daylight.
Coming next week: Go Green - Kitchen

Wednesday, June 3, 2009


Wednesday, May 27, 2009
Beer Baked Beans
This was the final dish for our Memorial Day cookout. Again, I have never made baked beans before and I will have to work on this recipe in the future.

But it wasn't bad for my first attempt.
Ingredients:
1 1/2 cups dried white beans or navy beans, rinsed
1/2 cup beer
1/4 cup onion, chopped
3 tablespoons molasses (I used honey instead)
3 tablespoons catsup
2 tablespoons brown sugar
1 tablespoon dry mustard
1 tablespoon cider vinegar
6 slices of bacon, 3 slices chopped
Directions:
~Place dried beans in the bottom of a large pan. Cover with 6-8 cups of water and bring to a boil. Reduce heat and simmer for 45 minutes to one hour. Remove from heat and drain, reserving liquid.
~Preheat oven to 250 degrees.
~In a large bowl combine the beans with the remaining ingredients, reserving 3 slices of bacon for the top. Pour into a buttered baking dish and bake, covered, for 4 to 4 1/2 hours, uncovering for the last hour of baking.
~Add reserved cooking liquid if beans become dry.
recipe modified from: The Joy of Cooking
German Potato Salad
This was the first Memorial Day in our new house so The Good Husband and I decided to invite over some of the neighbors over for a cookout. My job was to take care of the sides, while the other two couples were to bring a meat to grill and desert. This was dish one of three and honestly, I think the best.
I wanted something traditional for a cookout and potato salad is very traditional. The only problem is that TGH and I don't like American potato salad. TGH likes German Potato Salad but I had never had it before.
After reading a recipe for it in The Joy of Cooking, and learning it had bacon in it, how could it be bad?
 Overall it wasn't bad for my first attempt at GPS. I think it could have used more of the dressing, since the potatoes soaked it all up and there was nothing in the bottom of the bowl. But one neighbor absolutely loved it and asked for the recipe, so success!
Ingredients:
2 pounds potatoes, whole, with skins
1/4 pound bacon, chopped
1 medium onion, chopped
2 stalks celery, chopped
4 dill pickle spears, chopped
1/2 cup chicken stock
1/4 cup cider vinegar
1 teaspoon sugar
1 teaspoon paprika
1 teaspoon mustard powder
1 1/2 teaspoons kosher salt
1/2 teaspoon ground black pepper
Chopped fresh parsley (optional)
Directions:
~Add the whole potatoes (skin on) to a large pot of salted water, bring to a boil and simmer until the potatoes are tender and can be pierced with a fork, about 20-40 minutes.
~Drain the potatoes and allow to cool to a temperature you can handle. Remove skins and cut the potatoes into bite-sized pieces and place in a serving dish.
~Meanwhile, as the potatoes are cooling, cook the bacon in a small pan over medium heat, stirring frequently, until the bacon has browned. Remove the bacon from the pan, reserving the drippings and set aside. Add the onion and celery to the bacon drippings and cook until tender crisp. Add the pickles and remove from heat.
~In a small sauce pan, combine the chicken stock, vinegar, sugar, paprika, mustard powder, salt, and black pepper and bring to a boil.
~To serve, combine the cooked bacon to the potatoes and pour warm dressing on top. Toss to combine and serve warm and with a sprinkle of chopped fresh parsley.
recipe by: The Joy of Cooking
I wanted something traditional for a cookout and potato salad is very traditional. The only problem is that TGH and I don't like American potato salad. TGH likes German Potato Salad but I had never had it before.
After reading a recipe for it in The Joy of Cooking, and learning it had bacon in it, how could it be bad?
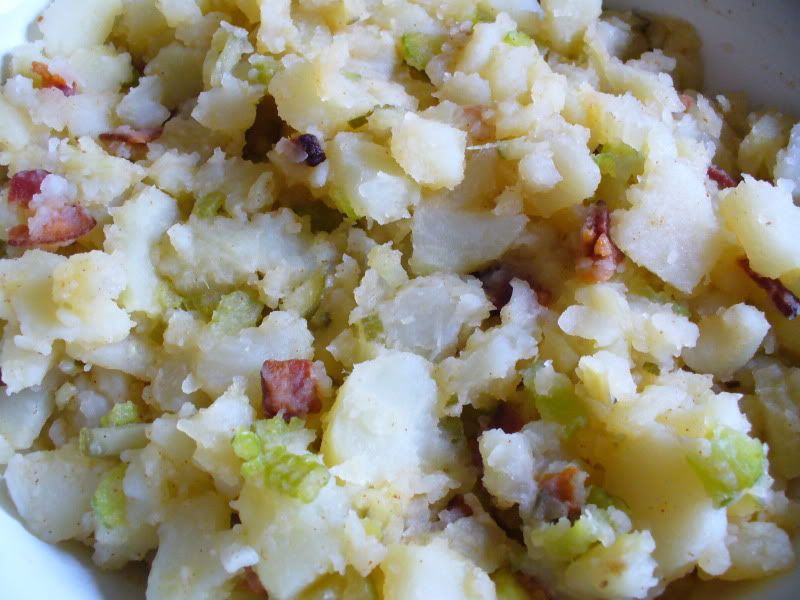 Overall it wasn't bad for my first attempt at GPS. I think it could have used more of the dressing, since the potatoes soaked it all up and there was nothing in the bottom of the bowl. But one neighbor absolutely loved it and asked for the recipe, so success!
Ingredients:
2 pounds potatoes, whole, with skins
1/4 pound bacon, chopped
1 medium onion, chopped
2 stalks celery, chopped
4 dill pickle spears, chopped
1/2 cup chicken stock
1/4 cup cider vinegar
1 teaspoon sugar
1 teaspoon paprika
1 teaspoon mustard powder
1 1/2 teaspoons kosher salt
1/2 teaspoon ground black pepper
Chopped fresh parsley (optional)
Directions:
~Add the whole potatoes (skin on) to a large pot of salted water, bring to a boil and simmer until the potatoes are tender and can be pierced with a fork, about 20-40 minutes.
~Drain the potatoes and allow to cool to a temperature you can handle. Remove skins and cut the potatoes into bite-sized pieces and place in a serving dish.
~Meanwhile, as the potatoes are cooling, cook the bacon in a small pan over medium heat, stirring frequently, until the bacon has browned. Remove the bacon from the pan, reserving the drippings and set aside. Add the onion and celery to the bacon drippings and cook until tender crisp. Add the pickles and remove from heat.
~In a small sauce pan, combine the chicken stock, vinegar, sugar, paprika, mustard powder, salt, and black pepper and bring to a boil.
~To serve, combine the cooked bacon to the potatoes and pour warm dressing on top. Toss to combine and serve warm and with a sprinkle of chopped fresh parsley.
recipe by: The Joy of Cooking
Coleslaw
This was dish 2 of 3 I made for our Memorial Day cookout. Again, it was the first time I had ever made this dish (a big hosting no-no) and you can certainly tell that it was my first attempt. I mean, have you ever seen pink coleslaw before?
No, I am sure you haven't. That's because the people that know how to make it, know how to make it not turn pink. I think my problem was that I added equal portions of both red and green cabbage to the mix. If I had stuck to a 2:1 or even a 3:1 ration of green to red cabbage, I could have avoided this pigmentation problem.
 But it tasted fine despite the unique color. I will have to prefect this dish.
Ingredients:
1 small head green cabbage, shredded
1 small head red cabbage, shredded
4 large carrots, shredded
1 cup mayonnaise
4 scallions, chopped
2 teaspoons cider vinegar
1/4 teaspoon Worcestershire sauce
1/4 teaspoon salt
1/4 teaspoon pepper
1/2 teaspoon sugar
Directions:
~Combine the cabbage and carrots in a large serving bowl.
~Combine the remaining ingredients in a small bowl and whisk to combine. Pour dressing over cabbage mixture and toss to combine. Refrigerate until ready to serve.
recipe modified from: The Joy of Cooking
No, I am sure you haven't. That's because the people that know how to make it, know how to make it not turn pink. I think my problem was that I added equal portions of both red and green cabbage to the mix. If I had stuck to a 2:1 or even a 3:1 ration of green to red cabbage, I could have avoided this pigmentation problem.
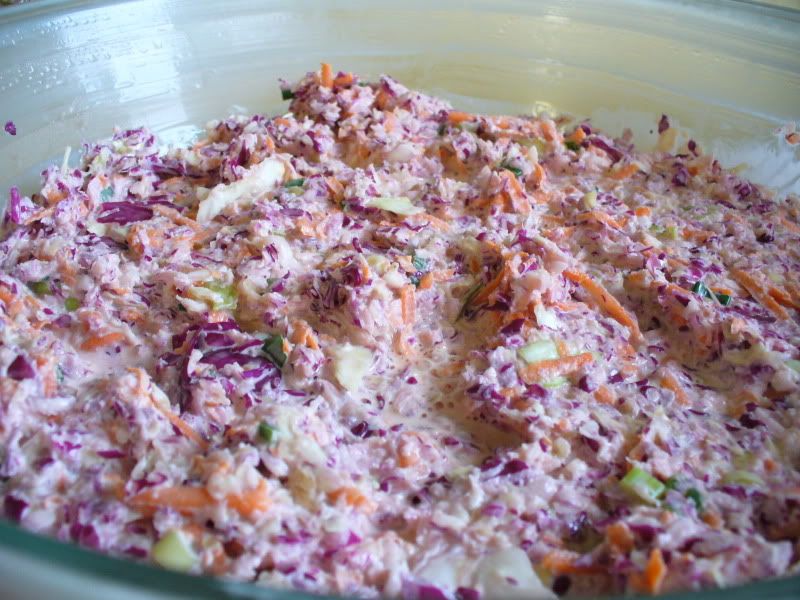 But it tasted fine despite the unique color. I will have to prefect this dish.
Ingredients:
1 small head green cabbage, shredded
1 small head red cabbage, shredded
4 large carrots, shredded
1 cup mayonnaise
4 scallions, chopped
2 teaspoons cider vinegar
1/4 teaspoon Worcestershire sauce
1/4 teaspoon salt
1/4 teaspoon pepper
1/2 teaspoon sugar
Directions:
~Combine the cabbage and carrots in a large serving bowl.
~Combine the remaining ingredients in a small bowl and whisk to combine. Pour dressing over cabbage mixture and toss to combine. Refrigerate until ready to serve.
recipe modified from: The Joy of Cooking
Tuesday, May 19, 2009
The Appliance Binder
One of the ways I stay organized is to have all the manuals and instructions for all of our appliances in one spot - in the appliance binder
 Before I used to keep all the booklets and instructions for our appliances in one drawer in the living room. But it was always disorganized and I had to pull out all the manuals before finding the one I wanted.
Now I have all the instructions and product information in one spot. I used a 3 hole punch to punch holes in all the booklets so they would fit nicely in the binder. Some of the booklets are too fat to use in the hole punch, however, so they either go in the pockets on the front and back cover of the binder or just in front, like the booklets for my washer and dryer.

I have also separated the manuals by category for quick and easy access. All of the instructions for The Good Husband's stuff, aka tools and garage, are placed in the back of the binder. Next electronics including our tv and home theater system are in the middle, followed by all of our kitchen appliances.
We were lucky enough to have all new appliances in our home when we moved, so we have a lot of manuals. I am currently using a 1 inch binder, but this might need to be upgraded in the future as we buy more things.

I also keep a list in the front of the binder of the major appliances - stove, fridge, dishwasher, washer and dryer, vacuum - that includes model number and any additional part number like vacuum cleaner bags or water filter for the fridge. That way all the numbers are right at my fingertips if I should need them and eliminates my need to find each separate manual.
All in all, an easy way to stay organized and clutter free.
 Before I used to keep all the booklets and instructions for our appliances in one drawer in the living room. But it was always disorganized and I had to pull out all the manuals before finding the one I wanted.
Now I have all the instructions and product information in one spot. I used a 3 hole punch to punch holes in all the booklets so they would fit nicely in the binder. Some of the booklets are too fat to use in the hole punch, however, so they either go in the pockets on the front and back cover of the binder or just in front, like the booklets for my washer and dryer.

I have also separated the manuals by category for quick and easy access. All of the instructions for The Good Husband's stuff, aka tools and garage, are placed in the back of the binder. Next electronics including our tv and home theater system are in the middle, followed by all of our kitchen appliances.
We were lucky enough to have all new appliances in our home when we moved, so we have a lot of manuals. I am currently using a 1 inch binder, but this might need to be upgraded in the future as we buy more things.

I also keep a list in the front of the binder of the major appliances - stove, fridge, dishwasher, washer and dryer, vacuum - that includes model number and any additional part number like vacuum cleaner bags or water filter for the fridge. That way all the numbers are right at my fingertips if I should need them and eliminates my need to find each separate manual.
All in all, an easy way to stay organized and clutter free.
Sunday, May 17, 2009
Homemade Peanut Butter
Why would anyone make homemade peanut butter when you can go to the store and get some peanut butter for about $1.50?

Well, first is quality.
Most of the cheaper peanut butters are loaded with sugar and hydrogenated oil. Even the organic or all natural peanut butters have sugar in them and they are well over $1.50. You get to control what you add and how smooth or crunchy it is.
Second would be cost. The cheapest and most basic peanut butter (think peanuts, salt and oil listed as the only ingredients) I found at my local store is close to $4 for a jar. On the other hand a 16 oz jar of roasted peanuts cost about $2 and yields the same amount of peanut butter as the $4 jar.
Lastly would be the ease which it takes to actually make homemade peanut butter. If you have a food processor, you basically just throw everything in the bowl and turn it on.
 In the beginning it will look like the mixture will never become peanut butter, but trust me, it will. One trick is to add the oil to the bowl first so that it comes up over the blades or close to them. Then add the salt and peanuts. Turn it on and just let it go.
I probably processed the peanut butter for close to 3 minutes before I got the consistency I wanted. I normally like super crunchy peanut butter, but with homemade, and even natural, it is a whole different ball game. Even the smoothest of homemade peanut butter is crunchy and that is fine by me.
Ingredients:
2 cups lightly salted dry roasted peanuts
4 tablespoons canola oil
1 teaspoon salt or more to taste
Directions:
~Combine all the in the bowl of a food processor and blend until the desire consistency.
~Store in an airtight container in the fridge.
recipe by: The Good Wife
See? Cheap, easy and fun, just like me. Wait a minute....
Saturday, May 16, 2009
Burrito, in a Bowl
Inspired by my trip to Chipotle and featuring my Salsa Verde, I came up with this dish that is both satisfying and surprisingly light.
 There are several different components to this dish and the trick is to season each layer, as well as marinate the chicken. I originally wanted to marinade that chicken with some chioptle peppers, which I thought I had on hand. Turns out I didn't so I substitute crushed red pepper flake for the heat instead. I used a lot of red pepper. Feel free to reduce or eliminate it altogether if you don't want that much heat.
For the marinade:
Ingredients:
1/2 cup canola oil
1/2 cup apple cider vinegar
1 tablespoon red pepper flakes
1 teaspoon garlic powder
1 teaspoon onion powder
1 teaspoon cumin
1/2 teaspoon chili powder
Directions:
~Combine all ingredients in a small bowl and whisk to combine.
~Pour marinade over chicken and allow to sit for hour hour or overnight. I allowed this to marinade overnight.
The next layer of flavor I added some spice to the store bought can of organic black beans. I used a combination of onion, garlic, cumin and chili powders (see a pattern here) as well as some lime juice to season the beans. In a small sauce pan, I added the beans, juice and all, to the seasonings and brought them to a boil and then allowed them to simmer on low while I cooked the chicken.
I diced the chicken into bite sized chunks and cooked over medium high heat until no longer pink, about 2o minutes.
To assemble:
In a bowl layer:
3/4 cup seasoned black beans
1/2 cup cooked diced chicken
1/4 cup Salsa Verde
1/8 Pico de Gallo or chunky red salsa
1/4 cup of Cojack cheese
2 tablespoons light sour cream
recipe by: The Good Wife
 There are several different components to this dish and the trick is to season each layer, as well as marinate the chicken. I originally wanted to marinade that chicken with some chioptle peppers, which I thought I had on hand. Turns out I didn't so I substitute crushed red pepper flake for the heat instead. I used a lot of red pepper. Feel free to reduce or eliminate it altogether if you don't want that much heat.
For the marinade:
Ingredients:
1/2 cup canola oil
1/2 cup apple cider vinegar
1 tablespoon red pepper flakes
1 teaspoon garlic powder
1 teaspoon onion powder
1 teaspoon cumin
1/2 teaspoon chili powder
Directions:
~Combine all ingredients in a small bowl and whisk to combine.
~Pour marinade over chicken and allow to sit for hour hour or overnight. I allowed this to marinade overnight.
The next layer of flavor I added some spice to the store bought can of organic black beans. I used a combination of onion, garlic, cumin and chili powders (see a pattern here) as well as some lime juice to season the beans. In a small sauce pan, I added the beans, juice and all, to the seasonings and brought them to a boil and then allowed them to simmer on low while I cooked the chicken.
I diced the chicken into bite sized chunks and cooked over medium high heat until no longer pink, about 2o minutes.
To assemble:
In a bowl layer:
3/4 cup seasoned black beans
1/2 cup cooked diced chicken
1/4 cup Salsa Verde
1/8 Pico de Gallo or chunky red salsa
1/4 cup of Cojack cheese
2 tablespoons light sour cream
recipe by: The Good Wife
Salsa Verde
I, or should I say The Good Baby, had a hankering for mexican the other day and I decided to go to Chipolte. I got a super yummy chicken burito bowl with tomatillo green chili salsa.
TGB loved it and it motivated me to try and recreated the dish at home.
First step - salsa verde or green salsa.
I don't think I have eaten salsa verde all that much in the past but I knew I could find all the ingredients at my local store, that is after I googled to find out just what the ingredients were.
TGB loved it and it motivated me to try and recreated the dish at home.
First step - salsa verde or green salsa.
I don't think I have eaten salsa verde all that much in the past but I knew I could find all the ingredients at my local store, that is after I googled to find out just what the ingredients were.
 For this recipe I choose green chili peppers, poblano and serrano peppers. The poblano is a mild pepper but the serrano is a step up from a jalapeno. If you remove the ribs and seeds from each pepper the heat will be slightly less. Or you can be crazy and leave them all in like I did.
I roasted the peppers under the broiler before processing them in the food processor after they had cooled. When I first tasted the salsa I thought it was a little too hot, that maybe I should have seeded the peppers, but by the next day when I had this for lunch, the heat had mellowed. If anything I would add a more serrano peppers to maintain the original heat level.

Ingredients:
1 can diced green chilies
2 poblano peppers
2 serrano peppers
6-8 small to medium tomatillos, husks removed
Zest and juice of one lime
1/2 tablespoon onion powder
salt
Directions:
~Broil the peppers and tomatillos for 24 minutes, turning after 12 minutes or until the skin of the peppers and tomatillos are blackened.
~Add the peppers and tomatillos to a bowl and when cool enough to handle, remove the charred skins of the peppers as well as the seeds and the ribs, careful to avoid contact with your eyes.
~Combine all the ingredients in the bowl of a food processor and blend until the desired consistency.
recipe by: The Good Wife
Wednesday, May 13, 2009
Mashed Cauliflower
I know it is hard to believe but even in The Good Household, we get a tad tired of mashed potatoes all the time. Blasphemy you say! But every once in a while it is nice to have some other form of mashed vegetable.
 Now, I should have googled a mashed cauliflower recipe before I made this, but being hardheaded like I am, I figured I could just wing it. I mean, all I needed to do was replace the potatoes with the cauliflower, right?
I think the final result turned out well. While the cauliflower didn't have the same texture as mashed potatoes, they were still tasty. I would make this again in a heartbeat but maybe I will google it first.
recipe by: The Good Wife
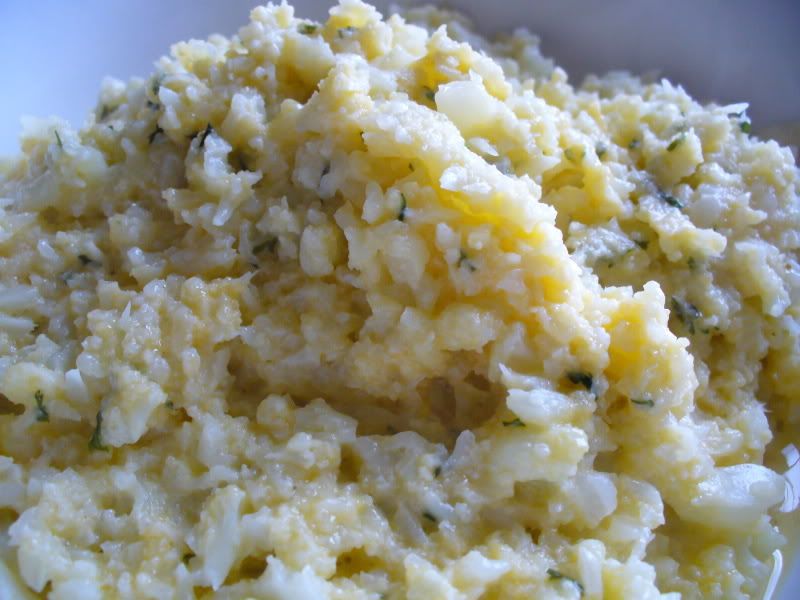 Now, I should have googled a mashed cauliflower recipe before I made this, but being hardheaded like I am, I figured I could just wing it. I mean, all I needed to do was replace the potatoes with the cauliflower, right?
I think the final result turned out well. While the cauliflower didn't have the same texture as mashed potatoes, they were still tasty. I would make this again in a heartbeat but maybe I will google it first.
Ingredients:
1 head of cauliflower, chopped
2 cups of chicken stock
2 tablespoons of butter
2 tablespoons of milk
1/2 tablespoon of garlic powder, roughly
1/2 tablespoon parsley, minced
1 cup cheddar cheese
Directions:
Directions:
~Add the cauliflower and chicken stock and bring to a boil on the stove top. Cover and reduce heat to a simmer. Simmer for 20 minutes or until the cauliflower is soft.
~Drain the cauliflower and add it back to the pot. Add the butter, milk and garlic powder. Mash with a potato masher. Add cheese and serve immediately.
~Drain the cauliflower and add it back to the pot. Add the butter, milk and garlic powder. Mash with a potato masher. Add cheese and serve immediately.
recipe by: The Good Wife
Subscribe to:
Posts (Atom)