Monday, December 28, 2009

Beer Bread Mix

My aunt introduced me to this bread. It is a wonderful quick bread and with all the different beer available, you can really vary the flavor every time. I wouldn't recommend a super cheap beer, but you also don't have to use the premium stuff either. A nice bottle of Sam Adams would be nice in this bread.


Ingredients:
2 1/2 cups flour
2 teaspoons baking powder
1 teaspoon baking soda
1/2 teaspoon salt
3 tablespoons sugar
1 1/2 teaspoons garlic and herb seasoning
12 once beer at room temperature

Directions to make:
~Mix all the ingredients and pour into greased pan.

~Bake at 350 degrees for 45-50 minutes. Serve warm.

Thursday, December 3, 2009

Why I buy recycled toliet paper

I will admit that I used to be an ultra plush toilet paper girl. I loved the fluffy soft feel of plush toilet paper. It was like wiping my butt with clouds. I didn't even like using public restrooms because of the tissuepaper thin quality of the tp. Only once did I buy a single ply, no name brand while in college after spending all my money on beer.

It chapped my ass. Literally. I swore never again to turn my back on Charmin.

Then I read this in the New York Times:

http://www.nytimes.com/2009/02/26/science/earth/26charmin.html?_r=2

February 26, 2009
Mr. Whipple Left It Out: Soft Is Rough on Forests
By LESLIE KAUFMAN
Americans like their toilet tissue soft: exotic confections that are silken, thick and hot-air-fluffed.

The national obsession with soft paper has driven the growth of brands like Cottonelle Ultra, Quilted Northern Ultra and Charmin Ultra — which in 2008 alone increased its sales by 40 percent in some markets, according to Information Resources, Inc., a marketing research firm.

But fluffiness comes at a price: millions of trees harvested in North America and in Latin American countries, including some percentage of trees from rare old-growth forests in Canada. Although toilet tissue can be made at similar cost from recycled material, it is the fiber taken from standing trees that help give it that plush feel, and most large manufacturers rely on them.

Customers “demand soft and comfortable,” said James Malone, a spokesman for Georgia Pacific, the maker of Quilted Northern. “Recycled fiber cannot do it.”

The country’s soft-tissue habit — call it the Charmin effect — has not escaped the notice of environmentalists, who are increasingly making toilet tissue manufacturers the targets of campaigns. Greenpeace on Monday for the first time issued a national guide for American consumers that rates toilet tissue brands on their environmental soundness. With the recession pushing the price for recycled paper down and Americans showing more willingness to repurpose everything from clothing to tires, environmental groups want more people to switch to recycled toilet tissue.

“No forest of any kind should be used to make toilet paper,” said Dr. Allen Hershkowitz, a senior scientist and waste expert with the Natural Resource Defense Council.

In the United States, which is the largest market worldwide for toilet paper, tissue from 100 percent recycled fibers makes up less than 2 percent of sales for at-home use among conventional and premium brands. Most manufacturers use a combination of trees to make their products. According to RISI, an independent market analysis firm in Bedford, Mass., the pulp from one eucalyptus tree, a commonly used tree, produces as many as 1,000 rolls of toilet tissue. Americans use an average of 23.6 rolls per capita a year.

Other countries are far less picky about toilet tissue. In many European nations, a rough sheet of paper is deemed sufficient. Other countries are also more willing to use toilet tissue made in part or exclusively from recycled paper.

In Europe and Latin America, products with recycled content make up about on average 20 percent of the at-home market, according to experts at the Kimberly Clark Corporation.

Environmental groups say that the percentage is even higher and that they want to nurture similar acceptance here. Through public events and guides to the recycled content of tissue brands, they are hoping that Americans will become as conscious of the environmental effects of their toilet tissue use as they are about light bulbs or other products.

Dr. Hershkowitz is pushing the high-profile groups he consults with, including Major League Baseball, to use only recycled toilet tissue. At the Academy Awards ceremony last Sunday, the gowns were designer originals but the toilet tissue at the Kodak Theater’s restrooms was 100 percent recycled.

Environmentalists are focusing on tissue products for reasons besides the loss of trees. Turning a tree to paper requires more water than turning paper back into fiber, and many brands that use tree pulp use polluting chlorine-based bleach for greater whiteness. In addition, tissue made from recycled paper produces less waste tonnage — almost equaling its weight — that would otherwise go to a landfill.

Still, trees and tree quality remain a contentious issue. Although brands differ, 25 percent to 50 percent of the pulp used to make toilet paper in this country comes from tree farms in South America and the United States. The rest, environmental groups say, comes mostly from old, second-growth forests that serve as important absorbers of carbon dioxide, the main heat-trapping gas linked to global warming. In addition, some of the pulp comes from the last virgin North American forests, which are an irreplaceable habitat for a variety of endangered species, environmental groups say.

Greenpeace, the international conservation organization, contends that Kimberly Clark, the maker of two popular brands, Cottonelle and Scott, has gotten as much as 22 percent of its pulp from producers who cut trees in Canadian boreal forests where some trees are 200 years old.

But Dave Dickson, a spokesman for Kimberly Clark, said that only 14 percent of the wood pulp used by the company came from the boreal forest and that the company contracted only with suppliers who used “certified sustainable forestry practices.”

Lisa Jester, a spokeswoman for Procter & Gamble, the maker of Charmin, points out that the Forest Products Association of Canada says that no more than 0.5 percent of its forest is harvested annually. Still, even the manufacturers concede that the main reason they have not switched to recycled material is that those fibers tend to be shorter than fibers from standing trees. Long fibers can be laid out and fluffed to make softer tissue.

Jerry Baker, vice president of product and technology research for Kimberly Clark, said the company was not philosophically opposed to recycled products and used them for the “away from home” market, which includes restaurants, offices and schools.

But people who buy toilet tissue for their homes — even those who identify themselves as concerned about the environment — are resistant to toilet tissue made from recycled paper.

With a global recession, however, that may be changing. In the past few months, sales of premium toilet paper have plunged 7 percent nationally, said Ali Dibadj, a senior stock analyst with Sanford C. Bernstein & Company, a financial management firm, providing an opening for makers of recycled products.

Marcal, the oldest recycled-paper maker in the country, emerged from bankruptcy under new management last year with a plan to spend $30 million on what is says will be the first national campaign to advertise a toilet tissue’s environmental friendliness. Marcal’s new chief executive, Tim Spring, said the company had seen intense interest in the new product from chains like Walgreens. The company will introduce the new toilet tissue in April, around Earth Day

Mr. Spring said Marcal would be able to price the new tissue below most conventional brands, in part because of the lower cost of recycled material.

“Our idea is that you don’t have to spend extra money to save the Earth,” he said. “And people want to know what happens to the paper they recycle. This will give them closure.”

____________________________________________

I cried as a kid when I saw the devastation of the Exxon Valdez oil spill and made my mom donate to the Wildlife Relief Fund.

I almost cried when I read this article and I switched to the Marcal recycled tp.

My ass has not been chapped and it is a good thing for Mother Earth.

Monday, November 23, 2009

Pan Roasted Cabbage Sprouts

I really wish there was a picture for this but hey, it gets dark at 4 pm now and I don't have any fancy lighting.

Using the cabbage sprouts I got at the Holiday Farmer's Market, I decided to modify a recipe I saw from Sunny Anderson on Cooking for Real. She used brussel sprouts instead.

Ingredients:
4 strips thick-cut bacon
2 tablespoons butter
1 pound cabbage sprouts, shredded
1/2 large onion, chopped
Salt and pepper


Directions:
~Cook bacon in a large skillet over medium-high heat until crispy. Remove, allow to cool and chop.

~Shred cabbage sprouts and add to the same pan with bacon fat. Add butter and onions and cook, stirring occasionally, until sprouts are golden brown, 10 to 12 minutes. Season with salt and pepper and add bacon back to pan.

~Serve warm.

recipe modified from: Sunny Anderson

Sunday, November 22, 2009

Holiday Farmer's Market

I joined a CSA this year which saved on going to the actual market.

How did it go, exactly, since I only blogged about it for a few weeks? We got a lot of corn, green beans, potatoes, squash, tomatoes and radishes. I froze a lot of the corn and squash to give to The Good Baby in a few months. We also ate a lot of green beans with bacon and mashed potatoes.

This weekend there was a Holiday Market which drew a lot of different vendors from the area. There were a lot of local meat vendors there, which was awesome, considering only a few make it to the regular farmer's market.

What did I score?

Natural White Cheddar

Honey candy

Cabbage Sprouts

Banana Blueberry bread

All Purpose Seasoning

Classic Catawba Wine

Chocolate Mocha biscotti

Apple Butter

(Not pictured) Beef Jerky

Chicken drummies

Beef Sticks

All of the goodies were either local, organic or both.

I am super excited to make the chicken since I already ate the jerky and beef sticks and they were amazing.

I plan on making pan roasted cabbage sprouts and potato gratin with white cheddar. I am not sure what I will do with the chicken. Maybe some braised chicken with white wine, but I am not sure.

Wednesday, November 11, 2009

The longest wait for food ever or Classic Sourdough Bread

Sourdough is on the list of 100 Foods I Want to Make. So cross another one off the list. Yay (just excuse that I totally missed the deadline)!

Every first Monday of the month my newspaper contains the Relish magazine insert. I always glance at it and think I will make something from it but I never do. Until I got October's issue.

There on the cover, in all it's carbohydrate goodness, was the most beautiful sourdough bread ever. I intently read the article to The Good Baby, assuring her in a few months she could eat some as well. Hell, in a few months the first batch might be finished by then.

It's no lie that sourdough takes forever to make. You have to make the starter and let it good and soured before you can even begin to think about making bread. But it was on my list and I wanted to concur it.

I made my first batch of bread 2 weeks after beginning my starter. I made the second batch a week after that. I could tell the difference. The sour taste was just a little more ripe than the first batch and just the way I like it.

So the wait wasn't that bad.


Sourdough Starter
Ingredients

3 (1/4-ounce) packets dry yeast
1 1/2 cups warm water
1 tablespoon granulated sugar
2 1/2 cups all-purpose flour


Instructions
~Dissolve yeast in water in a large plastic container (gallon-size works well). Add sugar. When yeast bubbles (about 10 minutes), stir in flour until you have a smooth paste.

~Cover loosely to allow gases to escape and place in a warm spot in your kitchen 2 to 3 days. The mixture should bubble and give off a sour odor. Stir starter once a day, making sure to stir in any crust that’s formed. After this point, you can store starter in the refrigerator or leave it out in a cool, dark area of your kitchen.

~Feed starter by stirring in 1 cup all-purpose flour and 1/2 cup water every day if you leave it out, or every few days if it’s refrigerated; otherwise, it will become too acidic and eventually die.

~Once starter has grown a few weeks and has reached full strength, you can decrease feedings to once a week.

~If you don’t use your starter regularly, it’s going to get unruly and burst the bounds of its container. Give some away to friends along with feeding and baking instructions.


Recipe by Gesine Prado, "The Start of Something Good," Oct. 2009.

Classic Sourdough Bread
Ingredients

1 cup Sourdough Starter (see recipe)
2 1/4 cups warm water, divided
5 to 7 cups white bread flour, divided
2 (1/4-ounce) packets dry yeast
2 teaspoons sugar, divided
2 teaspoons salt

Instructions
~Mix sourdough starter, 2 cups water and 5 cups flour in a large bowl. Mix well; cover with a dish towel and let rise 8 hours or overnight.

~Combine yeast, 1/4 cup warm water, and 1/2 teaspoon sugar. Let stand 5 minutes, until mixture bubbles.

~Place flour mixture in the bowl of a stand mixture. Add yeast mixture, salt and remaining 1 1/2 teaspoons sugar. Mix well. With your hands or a dough hook, knead while gradually adding up to 2 additional cups of flour, 1/2 cup at a time. Knead until a smooth, soft dough forms. Dough should be shiny and supple, not sticky and wet. If you plan to add additional ingredients (see note), add them at this point so they are evenly distributed.

~Place dough in an oiled bowl; cover with a dishtowel and let rise about 2 hours.

~Punch down and divide in half for 2 large loaves or fourths for 4 smaller loaves. Knead each portion by hand on a lightly floured surface until smooth; shape into rounds. Place on a parchment-lined baking sheet and lightly cover with a dishtowel. Let rise 1 hour, until double in size.

~Preheat oven to 375F. Just before placing bread in the oven, place an ovenproof bowl filled with 2 cups of water or ice cubes in the bottom of oven to create steam to help bread form a crisp crust.

~Slash tops of loaves with a sharp knife. For a rustic look, sprinkle with flour. Bake about 45 minutes, until loaves sound hollow when tapped on the bottom. Makes 2 loaves, 12 servings each.


Recipe by Gesine Prado, "The Start of Something Good," Oct. 2009.

The Organized Kitchen, Part 1 - Pots and Pans

When we moved from The Good Apartment, we went from literally one kitchen drawer and 5 cabinets to more than double that space. I had more than enough room for my tiny stash of kitchen wear but I still had enough for it to become messy if not controlled.

Previously, all the pots and pans were in the drawer under the stove. But we have a gas oven in the new house and that eliminated the pot and pan drawer. So I dedicated the double cabinet to the left of the stove as the pot and pan headquarters.

The cabinet looks like this:

My skillets are on the left, in order of size. The pots are in the back, smallest to largest. The lids are on the right. The shelf is reserved for the stock pots, my wok skillet and my extra 12 inch skillet. I got the lid holder for less than $10 at Target. I am able to see which lid I need quickly and easily. I only have 5 lids here but it will hold up to 7.

I also got the pan holder at Target for around $12. You can use it either vertically, like I did here or you can use it horizontally. I find I save more space using it vertically. It also comes with two screws so you can secure it to your cabinet but I haven't used them. I don't think I will need them, considering I have my cast iron skillets on the rack and it holds them just fine.
It holds 6 pans.


So instead of one big drawer under the stove, where everything would be piled on top of one another, I have a neat and organized cabinet. Having the pots and pans in this order allows for such ease of access, since I am not pulling out 5 pots to get to the middle one stacked inside.

Wednesday, October 28, 2009

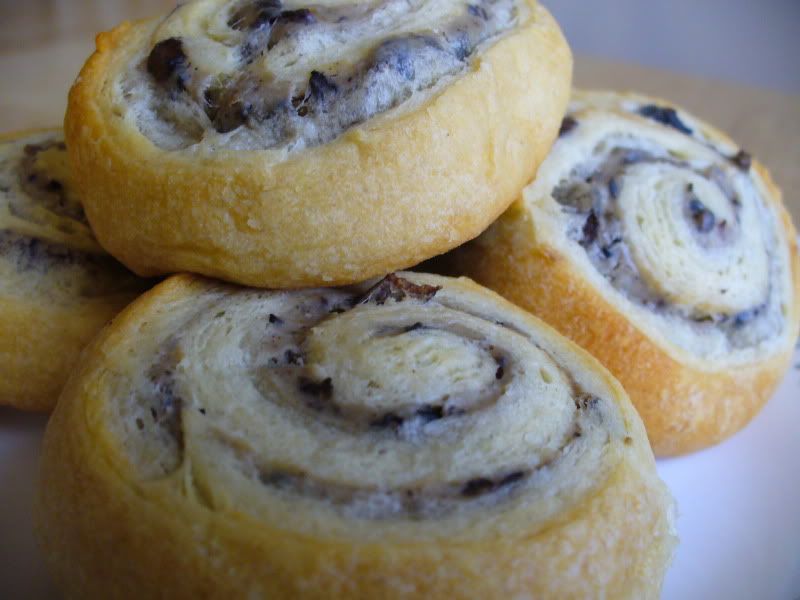
Bacon Mushroom Pinwheels

I was bored in the kitchen the other day. I wanted bread and I wanted bacon. I knew I would eat an entire loaf of bread and a pound of bacon, and even though I need 500 extra calories since I am nursing, I am not so sure all of that should "bad" calories.

So I decided to make this little recipe. It combined my need for bacon and bread and was super easy.


Ingredients:
1 package crescent rolls
6 strips of bacon
10-12 baby portabella mushrooms, chopped
6 ounces cream cheese, softened
1/2 tablespoon sour cream
1 teaspoon ground thyme
1/2 teaspoon rosemary
1/4 teaspoon sage
salt and pepper

Directions:
~Unroll the crescent dough and form into 4 rectangles, pinching the seams together.

~Chop the bacon and fry in a pan over medium high heat until brown and crispy. Remove the bacon with a slotted spoon, reserving the fat. Add the chopped mushrooms and cook until browned. Remove from heat and allow to cool to room temperature.

~In a small bowl, combine the cream cheese, sour cream, thyme, rosemary, sage and salt and pepper. Using a whisk or hand mixer, blend until combined. Add the bacon and mushrooms.

~Spread a thin layer on each of the four rectangles, about one fourth of an inch away from the sides. Roll up the rectangle from the short side, pinch to close and slice into one half inch thick slices.

~Bake at 350 for 12-14 minutes or until golden brown

recipe by: The Good Wife

Wednesday, October 14, 2009

How to Clean - Gum from the dryer

This is what I was greeted with as I pulled my clothes out of the dryer the other day. What in the world is that? Why an entire pack of unnaturally blue gum left from The Good Husband's pocket.

After grumbling under my breath and questioning the sanity of a thirty-something man to be chewing day glo blue gum, I had to find a way to get the sticky stuff out of my new dryer.

Oh, my poor dryer. I bought you just a mere 5 months ago. I researched you intensely and celebrated the day we got you. It was like the Second Coming but for laundry.

So off to Google to find out how to clean gum from the dryer. All of the links said the same thing - Use a wet fabric softener sheet to remove the gum.

Well in our quest to be green and chemical free, we don't use fabric softener sheets. So no dice.

Then I got a helpful tip from an internet friend who said to try vinegar.

I use it to clean everything else, so why not?

Following the tips from my Google, I ran the dryer on a hot cycle for 10 minutes to soften the gum. I then soaked a rag in vinegar and went to town. After some extreme labor and very serious contortioning - never buy a dryer you are too short to reach the inside bottom of the drum or one you are too fat to climb into - I was able to remove all the sticky mess. I had to stand on a step stool, climb almost into the dryer and then twist my body and head around and up in a position that would rival anything from Cirque de Soleil.

I was left inhaling vinegar fumes while all the blood rushed to my head, making all the curses I had for TGH more painful. The Good Baby will never be allowed to chew gum because of this. Although if she does, she is small enough to put in the dryer so maybe it will be cleaned faster.

After the gum was removed I threw in some old towel and let them dry for 20 minutes, just to make sure all the gum was gone.

So to recap:

1 - brand new dryer

1 - pack of bright blue gum

1/2 - gallon of white vinegar

4 - old rags

3 - total hours I wasted cleaning up this mess

1 - lesson learned to ALWAYS check the pockets of every pair of pants

Monday, October 12, 2009

Go Green - Cloth Diaper

It was The Good Husband's idea to cloth diaper (CD). It was one of those ideas he floated around before we had kids that I kinda just brushed off - like naming one of our kids Atticus.

Then I got pregnant and TGH got super cheap and started to research CD options. I soon took over the research and after a few days of intensive searching we came up our plan of attack.

The first and most overwhelming part of cloth diapering is distinguishing the different types of cloth diapers out there. There are several different kinds and styles. They range in price from the super cheap to the really expensive. We attended a cloth diaper class at a local store (Pinstripes and Polkadots) and were able to see the different styles and types of diapers and learn about cleaning them.

Then there is the Poo Factor.

At first it is a little gross to think about all that poo in your washing machine. However, breastfed babies have poo that is completely water soluble. It will rinse completely away. Secondly, everyone I know that uses disposable diapers will have blowouts, where the poo will explode from the diaper and cover a baby head to toe. All that poo gets on the baby's clothes and where do the clothes get washed? You guessed it - your washing machine. So if you have a baby, you will have poo in your washing machine at some point in time.

We did a combination of pre-fold diapers with covers and a one-size pocket diaper. This is the best mix of cheap and expensive diapers. What does that mean?

Pre-fold - This is what you think of when you think of CDs like your grandma used. They are called pre-folds, even though they are one big square, because in the dark ages of CDs this little diaper was actually 3 times bigger and had to be folded so all the absorbency was in the center.

Today's pre-folds are made to already have that absorbency in the middle so you don't have to fold it down to size. These work with a diaper cover. You will need to learn how to fold them however, to fit your baby and to fit inside a diaper cover. You will also need either diaper pins or Snappies to hold these closed.

Fitteds - These are similar to pre-folds but you don't need to fold and secure them with a pin or a Snappie. They come with snaps so it is super easy and fast to use. This is the best kind of diaper to use in the middle of the night, when you are tired and it is dark and you just want to change a diaper in world record speed to get back to sleep. Think of a cloth diaper in the shape of a disposable with snaps. These will need a cover too.

Covers - These replaced the plastic pants of yore. They have a cloth outside but most are PLU - polyester with urethane coating - on the inside to repel water and poo.

Pocket - This kind of diaper is getting close to a disposable in shape and ease but there is still some work involved. A pocket diaper has the inner cloth diaper and the cover swen together to create one diaper you just put on and secure with the hook and loop tabs (or snaps). You do have to stuff these diapers with a liner that looks like a panty liner but without the adhesive. This diaper is good if you have a heavy wetter, since you can control the absorbency. You do have to be careful when you wash these but I will address that below.

One-size - This is the easiest diaper to use in terms of sizing for your baby. If you don't want to have 5 different sizes of diapers, a one-size diaper will allow you to use the same diaper over and over again, adjusting for size as your baby grows. These diapers feature snaps that will rise with the baby so you never need to worry about having the right size of diaper again. All of these diapers are pocket diapers or all-in-ones - meaning they have the cloth diaper and the cover swen together.

Here is our stash as it looks today:

From bottom left to bottom right: covers, Snappies, cloth wipes, inserts, pre-folds, pocket diapers (the colored ones) and fitted diapers (the tan ones)

Here is what it looked like the first day we got them:

What is in our stash? (We wanted to wash our diapers every other day to every third day.)

~36 pre-fold diapers in Standard Infant (not pictured)
~5 fitted diapers in size 0 (not pictured)
~5 diaper covers in size XS
~15 one-size pocket diapers
~36 cloth wipes
~3 stay dry liners (for the pocket diapers)
~3 diaper doublers (for the pocket diapers)
~3 Snappies
~3 diaper pins
~1 wetbag
~1 pail liner
~2 pair of Baby Legs - b/c they are so damn cute

Prepping and Washing
Pre-fold diapers are not ready to use once you get them. You have to wash them several times in order to get the natural oils off the fibers and to make them absorbent. Notice the difference between the diapers from when I first got them (below) to what they look like now (first photo)?

They got nice and soft by washing them 7-8 times in hot water with just a drop of detergent and then drying.


You have to also pay extra attention to how you wash your CDs when they are soiled. Sadly, you don't want to use homemade laundry soap on them.

To wash the pre-folds, I just toss the diaper and the cloth wipe into the diaper pail and after a few days, empty the bag into the washing machine. I throw the pail liner in with the diapers and covers (although you don't need to wash the covers every time you use them. Unless the cover got poo on it, I usually can use it for a few times and then wash).

I do one cold rise, add a drop (seriously, like 1/8 of a cup) of detergent and wash on hot. I dry them normally.

Washing the pocket diapers are a little more labor intensive but not by much. When you are changing your baby you have to remove the liner and toss that into the diaper pail along with the wipe and diaper. You wash and dry your diapers in the same way as your pre-folds, only taking the time to stuff the pocket back into the diaper as you are folding them and putting them away.

With pocket diapers you have to be very careful you do not do anything to clog the microfiber holes that allow the diaper to absorb liquid. This means using certain types of laundry detergent and NO fabric softeners. I use Arm & Hammer Free and I have had no problems. You can find other CD Safe detergent here: http://www.pinstripesandpolkadots.com/detergentchoices.htm

We have been CDing The Good Baby for almost 4 months now and have not had any problems so far. Our water bills have only increased by less than $10 and we have only had one poo explosion. Overall I am totally happy with CDing. The $1500 I stand to save by CDing TGB and the $2000 I stand to save with each additional baby has been well worth it.