Showing posts with label DIY. Show all posts

Thursday, June 12, 2014

All Natural DIY Kool-Aid

Two things motivated me to create this super delicious drink: 1.) Summer feels like it is almost here and there is nothing more summery to me than eating some watermelon; and 2.) My kids turn into raging assholes when they consume red dye. Think of the Hulk after a 3 day coke/PCP bender. That shit ain't pretty.

So I limit their intake of the liquid red devil but damn it if the kids didn't score some off the neighbors like some cheap crack and they have begged me for it ever since.


Lucky for my little beasts, fresh, local watermelon hit the market the last few weeks and I have been turning it into this DIY All Natural Kool-Aid alternative. And the kids can't get enough. I can't say that I blame them. 

There is nothing better for a kid than drinking some sugary sweet drink outside before running through the sprinkler. The only thing better, they will learn in 13 years, is the sweet taste of that sugary drink with some vodka. Yum!


This is super easy to make too. Just throw everything in a blender and let it liquify. Then strain and serve with some ice (and booze for the adults). So easy I make this while I am cleaning the cutting board after chopping up all that damn watermelon.

I want to try strawberry next. We shall see how that goes.


Ingredients:
4 cups chopped seedless watermelon
2 tablespoons organic sugar or preferred sweetener to taste
2 tablespoons lime juice

Directions:
~Combine all ingredients into a blender and blend until liquid. Strain through a sieve, discarding pulp. NOTE: You can also save the pulp, mix it with water or yogurt and freeze in pop molds.

~Serve over ice. Add booze if you are feelin' frisky. 

recipe by: The Good Wife

Monday, November 25, 2013

Mid Century Makeover

The Good Son's room was a hot mess. Remember? We had the home computer in there for god knows what reason. But TGS is getting bigger and he needs his own space. So we wanted to move the computer into the living room and give TGS more storage in his room and space to play.

I had gone hunting for the perfect dresser for him when I was pregnant and found a mid century beauty on Craigslist and snapped it up. But then I never turned off the RSS feed so I get daily updates on all the mid century stuff listed from here to St. Louis. And I just happened to find this cute little bookcase from a local resale store. So I packed the kids up, got lost trying to find the place and the stored the bookcase in my garage for a few months.

aw, look at 50 years of dust. you will get another 50 years worth here, little one

It was a little shakey and the back had come loose in the move so I decided to remove the backing panel and make a new one. But not just any new one - a cool, awesome, vintage-y new one. So I ordered a vintage world map from Amazon and Mod Podged that bitch on.

And this is what the bookcase looks like now. Sweet, huh?


I used Mod Podge Hard for furniture and just slapped the coats on. I did 3 coats before I added some concentrated tea to the glue to help give the map that old, yellowed look. I did three more coats of the glue/tea combo before 1 final coat of just glue.

Then I nailed everything together with the help of The Good Daughter. The bookcase is solid now, with no movement. The shelf is more stable too. Overall I am over the fucking moon for this.


Before, all of TGS's toys were stacked on top of the dresser, which is ok in photos, but try and change a 16 month old on that without him knocking all the shit over. Not good. He needed more storage.

 
And just look at TGS's room now. I moved the dresser to the spot of the former computer and put the bookcase under the window. I filled it with all of TGS's toys which get them the hell out of the living room.


Everything is nice and neat. There is a spot for everything and everything is out for easy access.


Look at how awesome it is. There is so much room for more books, my personal favorite. I can't wait until Santa Grammy and Papa help fill this up this Christmas.


I can't believe that I have actually "refinished" some furniture now. Like a fucking adult. I feel so grown up.  

Tuesday, September 10, 2013

Make-up Organization: Take Two!

Awhile ago, I talked about how I organize my make-up. Taking one look at the original, you would know that eventually it would turn into a mess. And it did. I mean, just look at this shit.


I must have been smoking some good stuff that week to think the drawer would stay neat and organized.

I said at the time that organizers would be the best bet to keep everything contained and corralled. I was right. However, instead of buying a tray at the store, I decided to upcycle some boxes around the house and make trays.


All of the boxes were cereal boxes, a few tea boxes and I think one granola bar box. Like any good mom, I feed my kids the sugary cereal in the mornings, so in no time, I had enough boxes to fill the drawer. I just wrapped them in pretty scrapbook paper once I cut them to fit the height of the drawer.


And then I filled them all in. 

There were some places where the boxes created holes but I was able to fill these with little things like bobby pins and my extra contact case or rubber bands for The Good Daughter.

If you are new to the blog, know that my number #2 organization tip is to group things with similar functions together to save time and create functionality. This is a great example. 


So all of my lip stuff goes in one box, sandwiched between eye make-up and deodorant.


Contacts and foundations are in the first box followed by my brushes and moisturizer and make-up setting spray followed by my contact cleaners and disposable contacts.


Bronzer and pressed powder in another box.


Samples and rarely used items are all the way in the back.


I makes me so happy to open my drawer in the morning and have everything in a spot I can find. It even motivates me to wear most of the stuff.

So the next time you need to organize something, ask yourself if you have something on hand like cereal boxes you could use instead of buying something new. It will make you feel like a dirty hippy to upcycle. But you wont' smell like patchouli, I promise.

Friday, May 24, 2013

Love You to Pieces Father's Day (or B-Day) Craft

So The Good Husband had a birthday recently. He is generally a sour puss when it comes to all things celebrating. I, on the other hand, LOVE LOVE FUCKING LOVE ELEVENTY!!!1!!!!11!!! all thing even slightly celebratory. I especially love birthdays when it is a day to celebrate you. 

So keeping in mind TGH likes shit low key and we are on a budget this year, I decided to do a simple craft to celebrate the day he graced the universe with his presence. Break out the hot glue guns! 


I have seen this floating around in the Internets, usually in a Father's Day craft round up. And don't get me wrong, this is a *perfect* Father's Day craft. It has the right amount of cheesiness.


To make it, all you have to do is cut out a collar and tie (I used printer paper glued to cardstock) and a We Love You To Pieces cut out. Then glue them on to a jar (I used a pint mason jar) and fill the jar with Reese's Pieces. We love you to {Reese's} pieces. Get it?

How cute!!

But let's face it. TGH really didn't give a shit about it. He hugged us all as thanks b/c that's his job, but he only really cared about a jar full of candy that he and only he got to fucking eat. 

Wednesday, May 15, 2013

Hair Accessories Organizer AKA Hair Pretty Holder

When The Good Daughter was a tiny little thing, I thought I didn't have to worry about hair accessories. I mean, I only have the barest few to get me by. I don't even wash my hair daily, so there's that too. 

I wish now, that I had gotten a giant ass bow for her when she was a newborn but I didn't. And then she didn't grow hair for nearly 2 years. Bless her heart. 

She's going on 4 now and has gotten some hair accessories along the way. She calls them hair pretties.

Look at that sweet face. A mugshot, 16 years in the making

Before I just had them all lumped in a box in her dresser, but it was messy and unorganized. I wanted a way for TGD to see all her choices but in a way that wouldn't drive me nuts or require any work on my part. Lazy parenting FTFW.

So I made this hair accessories organizer aka hair pretty holder to hang in our bathroom.


All of her hair pretties are hanging out for her to see - flower clips or headband? the eternal question - and choose in the morning.

It was a simple thing to make too - just some foam board, fabric, ribbon and pegs. I did have to fiddle with the head band holders but after some more hot glue, they are now even and can hold several more head bands. 

I decided to use 4 ribbons for hair clips. Then I added two loops that attach with velcro to hold her ponytail holders and then the two pegs for head bands. I attached it to our linen closet in our bathroom using command strips. I imagine when TGD gets a little older, I can hang this in her room.

For now they keep my bathroom and her room hair pretty clutter free.

Friday, April 9, 2010

Homemade Butter

Did you know that organic butter costs $7/lb? I thought it would be cheaper to make butter than to buy butter, at least the organic kind. After searching several stores, I finally found the one in town that sold organic heavy whipping cream. I bought two pints for $6.98.

I had read several different blog post about how to make butter and it seemed fairly easy. You just put the cream in your mixer, blender or food processor and turn it on.

Little did I know just how long it would actually take.

This is when the cream started to thicken. See how it clings to the beater?

This is when you would call it quits if you wanted whipped cream.
The butter has just started to form. This was about ten minutes into the process. I was beginning to worry that I had messed something up since the fat wasn't coming together like I knew it should. But I finally made it to this stage. From here, I put the butter curds in a strainer over a bowl and gently rinsed with cold water.

I added the butter back to the mixer and added a little more water to completely rinse all of the buttermilk away. I processed in the mixer for a few second and gave it a final drain.
This is the finished product. Sweet, beautiful organic butter.
Now here are the details. From two pints of cream I was able to make 2 cups or about a pound of butter. So I saved about two cents making my own butter. But I also got almost 3 cups of buttermilk out of the process. Now I don't know how much I saved there because I don't buy buttermilk all that much and if I do, I certainly don't buy the organic kind since I can't find it.

So I don't know if I will make butter on a regular basis or just buy it already made. All I know for sure is I am super thankful I didn't have to churn this by hand the way my grandma did.

Wednesday, January 27, 2010

Homemade Baby Food

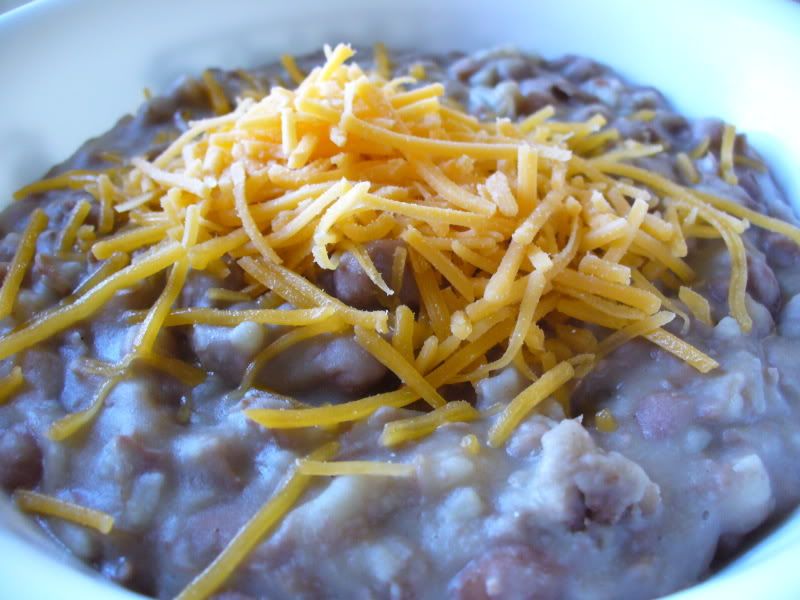
I sound like a broken record when I recount how cheap The Good Husband is, but it is true. I am lucky he doesn't turn 2 ply toilet paper into 1 ply to save money. I would divorce him then.

So along with cloth diapering, breastfeeding and getting most of The Good Baby's clothes from yard sales, we decided to make most of TGB's food.

The first thing I did was buy Top 100 Baby Purees: 100 Quick and Easy Meals for a Healthy and Happy Baby by Annabel Karmel. I really like this book. It has all the recipes broken down by age. There are some funny recipes in there for dinners like "My First Fish Puree" and "Pasta with Butternut Squash, Tomato and Cheese". Not meals you generally think of for babies, but I like the author's idea that babies don't have to eat bland foods.

In fact, we are tying to expose TGB to a wide range of foods.

We are tying to limit TGB's exposure to chemicals in every way possible. The biggest factor being what she consumes. So we are trying to buy as much of her food organic if possible.

It isn't easy. There are a lot of foods I just can't find organic. When was the last time you saw an organic parsnip? So without the aid of the Farmer's Market and using The Dirty Dozen and Clean 15, as a guide, I have decided to make all of TGB's food at home and for super cheap.

Here is just a sample of what I have made so far:

The Veggies

From left to right: back row -Sweet Potato, Corn, Carrot, Cauliflower. front row - Green Beans, Parsnip, Broccoli

The Fruits
From left to right: Pear, Peach, Apple, Blackberry
Not pictured: Zucchini, Apricot, Rutabaga, Spinach, Butternut Squash
(This picture strikes me as some work of modern art. It has to be the lighting.)

Making your own baby food has several benefits.

First, I can control the quality. As I mentioned, we tried to get all organic produce.

Secondly, it is cheaper.

Consider, I can buy one jar of organic baby food on sale for $1. Right now, that is two servings for TGB. For $2, I can buy a bag of frozen corn on sale and that will produce about 2 ice cube trays of corn puree, or 14 2 once servings. So it costs $0.14 for one serving of homemade baby food, versus $0.50 for organic jarred.

That alone should be reason enough to make your own.

But making your own baby food also produces less waste, since you don't have to have multiple single use jars lying around. You could make cute Halloween decor with them, but still, most people just recycle them.

Making your own baby food is also super easy. Basically all you have to do is steam and puree all the foods and freeze. Fruits like peaches and blackberries, you can just puree directly from the frozen and then refreeze. I use ice cube trays to freeze them and each cube is about one once.

You can also experiment with several foods. I noticed that veggies like broccoli, cauliflower and zucchini didn't seem to be popular baby foods. Either was parsnips or rutabagas. But now I can make my own and TGB can eat a wider range of foods.

She loves peas and carrots and all the root veggies, so far, so I am a happy Good Wife.

So for anyone looking to either save money or control the quality of food your baby consumes, I would recommend making your own baby food.

Sunday, May 17, 2009

Homemade Peanut Butter

Why would anyone make homemade peanut butter when you can go to the store and get some peanut butter for about $1.50?


Well, first is quality.

Most of the cheaper peanut butters are loaded with sugar and hydrogenated oil. Even the organic or all natural peanut butters have sugar in them and they are well over $1.50. You get to control what you add and how smooth or crunchy it is.

Second would be cost. The cheapest and most basic peanut butter (think peanuts, salt and oil listed as the only ingredients) I found at my local store is close to $4 for a jar. On the other hand a 16 oz jar of roasted peanuts cost about $2 and yields the same amount of peanut butter as the $4 jar.

Lastly would be the ease which it takes to actually make homemade peanut butter. If you have a food processor, you basically just throw everything in the bowl and turn it on.

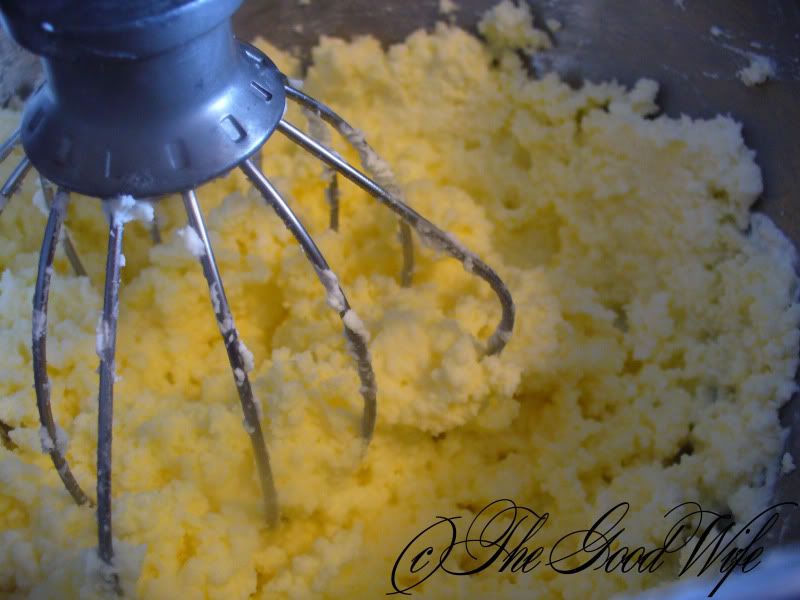
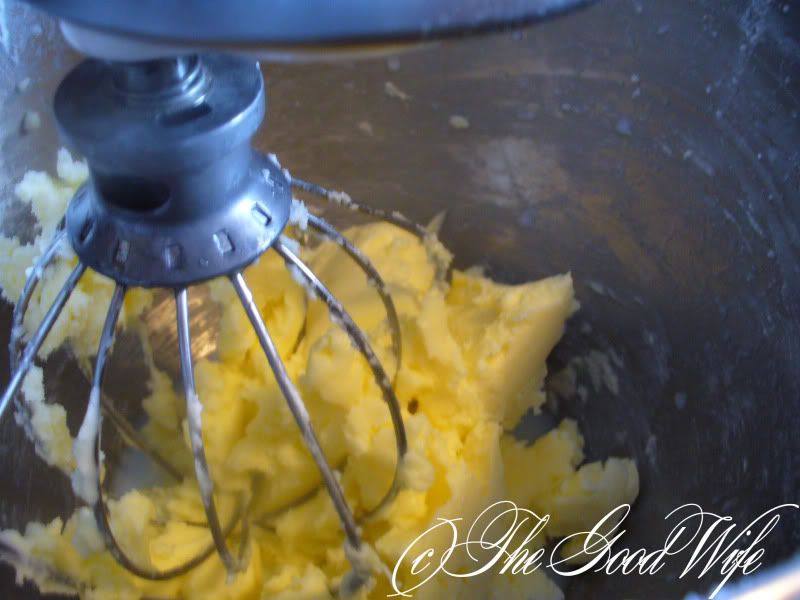
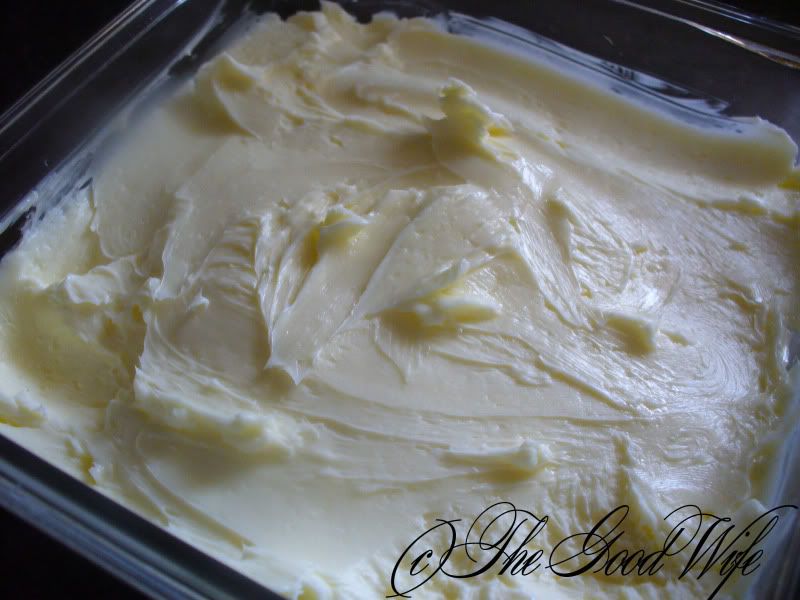
In the beginning it will look like the mixture will never become peanut butter, but trust me, it will. One trick is to add the oil to the bowl first so that it comes up over the blades or close to them. Then add the salt and peanuts. Turn it on and just let it go.

I probably processed the peanut butter for close to 3 minutes before I got the consistency I wanted. I normally like super crunchy peanut butter, but with homemade, and even natural, it is a whole different ball game. Even the smoothest of homemade peanut butter is crunchy and that is fine by me.

Ingredients:
2 cups lightly salted dry roasted peanuts
4 tablespoons canola oil
1 teaspoon salt or more to taste

Directions:
~Combine all the in the bowl of a food processor and blend until the desire consistency.

~Store in an airtight container in the fridge.

recipe by: The Good Wife

See? Cheap, easy and fun, just like me. Wait a minute....

Sunday, April 26, 2009

Refried Beans

I have a weakness for Taco Bell. Yes it is not the healthiest and you would think that even after working there for a year and seeing how everything is made, I wouldn't like it. But I still can't shake my love for cheap, easy food and every now and then I have to get some refried beans.

Then after staring this blog and reminiscing over my culinary accomplishments, I realized that there is a lot of premade food that would be super easy to make at home. This is one of them.

I had occurred to me that I probably never even had homemade refried beans before. Yes, I eat at other Mexican places than Taco Bell, but honestly, all the refried beans looked strikingly similar to Taco Bell's or the stuff you get out of a can.


I will say that making this was super easy. First of all, I bought canned beans. Now we can debate how much that qualifies this as truly homemade but when I can get one can of organic pinto beans for $1 versus a 1 pound bag for $3 something, well, then cheapness wins out and I went for the can.

The refired beans tasted nothing like what I have ever eaten before. I don't know if that was due to the organic beans or the lack of animal lard (seriously, look on a can of refried beans sometime. Animal lard is in there). They were a cousin to all the refired beans I had ever had before. I need to work on the seasonings, since the beans seemed a little bland, but overall they were good.

And hey, I knocked another food off my 100 Foods List.

Ingredients:
1 can pinto beans
1 medium onion
2 cloves of garlic
2 tablespoons butter
salt
Cheddar cheese (optional)

Directions:
~Dice the onion and garlic. In a skillet over medium heat, melt the butter. Add the onion and garlic. Add salt to taste and cook until soft, about 10 minutes.

~Drain the beans, reserving the juice. Add the beans to the onion and garlic mixture and cook for 5 minutes.

~Using a potato masher, mash the beans until they reach the consistency you desire. If needed add some of the reserved juice.

~The beans will thicken considerably when removed from the heat, so removed from heat when the beans still look watery. Let stand 5 minutes and top with cheese or diced onion.

recipe by: The Good Wife