Friday, January 23, 2009

Mexican Tortilla Soup

As I said in my previous post, I was looking for recipes that contained lime and/or cilantro. This is another Rachel Ray recipe I found using both ingredients. I normally have a love/hate relationship with soup. There are only a few that I actually like and I usually prefer (unless it is a cream soup) for soup to be thick.

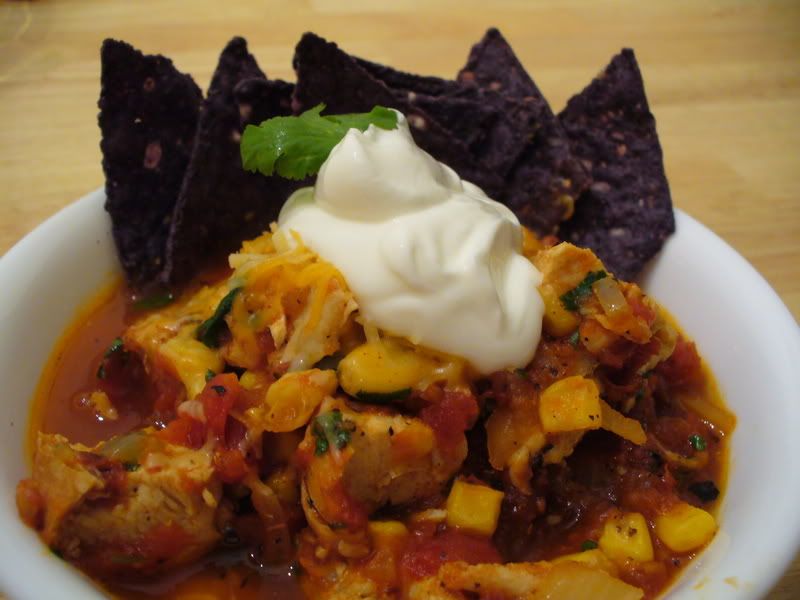
I also modified the way I made this recipe by a lot. I just read the directions and then almost did the opposite, but I will explain that more below. The original recipe also didn't call for corn, but I thought it would be a great addition. I would have also added some black beans, had I had any.

The original recipe also called for a pile of crushed chips to be added to the bottom of the bowl and then the soup poured on top. I found that the chips got way to soggy for my liking. On second serving of this I just placed some chips on top and dipped additonal chips in the broth. I liked it much better that.

Ingredients:
3 cups chicken stock
1 pound chicken tenders
1 bay leaf, fresh if available
1 tablespoon extra-virgin olive oil
4 slices thick, smoky center cut bacon, chopped
1 onion, finely chopped
4 cloves garlic, chopped
2 chipotles in adobo, chopped, plus 2 tablespoons sauce
1 (28-ounce) can crushed fire roasted tomatoes
Salt
1 can corn, drained
1/2 teaspoon cumin
1/4 teaspoon red pepper flake
4 cups lightly crushed corn tortilla chips
2 cups shredded fresh smoked mozzarella or smoked sharp white Cheddar
1 lime, cut into wedges
1/2 red onion, chopped
Freshly chopped cilantro leaves, for garnish

Directions:

~Bring broth to a simmer and add chicken tenders, poach 6 to 7 minutes with a bay leaf. While chicken poaches, heat extra-virgin olive oil in a medium soup pot or deep skillet over medium-high heat. Add bacon and cook until crisp then remove with slotted spoon. Drain off excess fat, leaving 2 to 3 tablespoons in the pan. Add onions and garlic to the skillet and cook 5 minutes then stir in chipotles and tomatoes. (Since the purpose of this recipe is to deliver smokey flavors, I decided that I would sear the chicken on the outside, to get a nice caramelized color, before poaching them. The poaching time was less, but since I seared them, the overall cooking time was the same. I followed the original directions in cooking the bacon and the onions.)

~Remove chicken from stock, dice and then add to soup. Pass stock through a strainer then add to the soup. (I also added cumin and red pepper flake to the soup to give it more of a kick. I also added the cilantro directly into the soup, as well as the juice of 2 limes. I added a can of corn kernels, drained. Mexi-corn and black beans would also be a good addition and would add more heft to the soup. The soup also looked a tad too thick, even for me, so I added one chicken bullion cube and one cup of water.)

~Place a pile of crushed tortilla chips in the bottom of each soup bowl. Cover liberally with smoked cheese then ladle the hot soup down over the top. Serve with lime, raw onions and cilantro at table to finish the soup.

recipe by: Rachel Ray

Tuesday, January 20, 2009

Poll Results

The results are in and the most favorite thing about the holiday season is the holiday spirit. This was followed closely by spending time with family. The food - my personal favorite - rounded out the only picks.

Thanks you everyone that voted.

Friday, January 16, 2009

Surf N Turf Meatballs

I was cruising through my cookbooks before heading out to the store last weekend and I ran across this Rachel Ray recipe. I had made it before and it was pretty good, so I thought I would give it another go. The recipe called for lime and cilantro so I quickly found 3 other recipes that used on or the other or both (posts to follow).

I will add that a funny thing I am noticing about pregnancy now is that my taste buds are kind of on the fritz right. I remembered these being really good the first time I made them. I liked the balance between the crab (I used imitation because I am both cheap and lazy) and the pork and there is a strong Asian flavor in the sauce and meatball itself. The soy in the meatball also creates a sort of caramelized crust on the outside.

This time something seemed....off. I know it wasn't the recipe or the ingredients so I will blame it on the pregnancy hormones and say that this is a great recipe otherwise.

I will note however, that just a meatball and sauce got a little old after a while. I think the next time I make this, I will use the meat mixture as the base of a dumpling.
Ingredients:
4 scallions, green and white parts, coarsely chopped
2-inch piece fresh ginger, peeled
1 serrano chili pepper, seeded and finely chopped, divided
2 cloves garlic, crushed
1/2 cup tamari, plus 3 tablespoons, dark soy, I used regular soy sauce
1/4 cup fresh cilantro leaves, a big handful
2 limes, zest and juice
1/2 pound medium shrimp, shelled and deveined, tails removed, I used imitation crab meat
1 pound ground pork
4 tablespoons vegetable oil
1 teaspoon dark sesame oil
1 tablespoon honey
3 tablespoons water

Directions:
~In the bowl of a food processor combine the scallions, half of the ginger – grated or minced, half of the chopped chile pepper, garlic, 3 tablespoons tamari, cilantro and the lime zest. Pulse for 30 seconds, scrape down the bowl and then continue to process 1 minute or until finely ground. Add the shrimp and pork, process until the shrimp are ground into small pieces and the mixture is well combined but not so fine that it becomes a paste, about 1 minute. Roll the shrimp and pork mixture into to 24 balls, about the size of a large walnut. If you dip your hands in water before rolling the mixture the rolling goes a little easier.

~Preheat a large nonstick skillet with 4 tablespoons of vegetable oil over medium heat. Add the balls and don't move them until they are brown on 1 side, about 2 minutes. Turn the balls and continue to cook, browning on all sides until cooked through, about 4 minutes.

~While the balls are cooking make the spicy lime dipping sauce: in a bowl combine the remaining ginger, chili pepper, 1/2 cup tamari, lime juice, toasted sesame oil, honey and 3 tablespoons (a splash) of water. Taste and adjust the seasoning, if you find it to be too salty, add another drizzle of honey.

~Platter the shrimp and pork balls with a bowl of the spicy lime dipping sauce and toothpicks.

recipe by: Rachel Ray

Thursday, January 15, 2009

Nutty Banana Bread

Of course the easiest thing to make with your brown bananas is banana bread. I love banana bread but when I normally make it, it is without the nuts, since nuts are something that I don't really keep on hand. So having a nutty banana bread is a real treat. I even add some toasted walnuts to the bread when I eat it. Yum.

And forget about that cooling completely jazz. I eat this baby warm, straight out of the oven. Oh heaven.


Ingredients:
2 cups all-purpose flour
1-1/2 teaspoons baking powder
1/2 teaspoon baking soda
1/4 teaspoon salt
1/4 teaspoon ground cinnamon
1/8 teaspoon ground nutmeg
2 eggs, beaten
1-1/2 cups mashed banana (5 medium)
1 cup sugar
1/2 cup cooking oil or melted butter or margarine
1/2 cup chopped walnuts

Directions:
~Preheat oven to 350 degrees. Grease one 9x5x3 pan.

~In a large bowl combine flour, baking powder, baking soda, salt, cinnamon and nutmeg. Make a well in center of flour mixture; set aside.

~In a medium bowl combine eggs, banana, sugar and oil. Add egg mixture all at once to flour mixture. Stir just until moistened (batter should be lumpy). Fold in nuts. Spoon batter into prepared pan.

~Bake for 55 to 60 minutes or until a wooden toothpick inserted near center comes out clean. Cover the loaf loosely in foil to prevent over browning during the last 15 minutes of cooking. Cool in pan on a wire rack for 10 minutes. Remove from pan. Cool completely on a wire rack.

~Serve warm with butter and toasted nuts.

recipe by: Better Homes and Gardens

Tuesday, January 13, 2009

Famous Chicken Enchiladas

I have to give major credit to The Good Husband for finding this recipe. This by far is one of our favorite dishes. I have made it for family gatherings and it is by far the most requested recipe. I have made it so many times that I actually have the recipe memorized, which is not a small feat for me.

I don't think this is a traditional enchilada, since it is cream based and not a red sauce. Also, the cream cheese in the recipe gives some pause, but trust me, it is good. Very good. TGH and I have made this several ways. We have made it with flank steak instead of chicken, with corn tortillas instead of flour and one time, in the dark days of a low carb diet, even without the tortillas. Both times it was good.

But chicken is the original recipe and by far our favorite preparation.

Ingredients:
1/4 cup chopped onion
2 tablespoons butter
1 3-ounce package cream cheese, softened
1 tablespoon milk
1/4 teaspoon ground cumin
2 cups chopped cooked chicken
12 7-inch flour tortillas
1 10.75-ounce can reduced-fat condensed cream of chicken soup
1 8-ounce carton light dairy sour cream
1 cup milk
2 cups shredded Monterey Jack cheese

Directions:
~In a medium skillet cook the onion and butter over medium heat until onion is tender. Remove from heat.

~In a medium bowl stir together cream cheese, the 1 tablespoon milk and the cumin; add onions and chicken and stir until combined. Spoon about 3 tablespoons of the chicken mixture onto each tortilla near an edge; roll up. Place filled tortillas, seam side down, in a greased 3-quart rectangular baking dish. Set aside.

~For sauce, in a medium bowl combine the soup, sour cream, and the 1 cup milk. Pour evenly over the tortillas in the baking dish. Cover with foil. Bake, uncovered, in a 350 degree oven about 35 minutes or until heated through. Remove foil. Sprinkle with cheese and cook uncovered for 10 minutes more.

recipe modified from: Better Homes and Gardens

Saturday, January 3, 2009

Italian Bread

This Christmas, with money being tight, and me cooking more, I decided to make homemade gifts for my family. The traditional route for homemade food gifts at Christmastime is to do something sweet. But I opted for the complete opposite figuring that most people's sweet tooth would be already soothed.

I decided to make homemade noodles, sauce and Italian bread.

The bread was actually the easiest thing to make out of the three. My Kitchen Aid Stand Mixer did most of the work and I just tried not to burn the bread.

Now, I have always had a weakness for a good old loaf of bread. If all I ever had to eat and drink were bread, wine and cheese, I would die a fat and happy girl. But now that wine and some cheese is off the menu while I am cooking up The Good Baby, my only comfort is copious amounts of bread. It is also worth noting that my pregnancy stomach seems to handle milk and bread only right now.


Since this was really my only third attempt at bread making, I can say that I am very pleased with the results. I learned from the mistakes I made when making French Bread and White Sandwich Bread it, indeed, helped me to produce a better product this time around.

First off, I wasn't gentle in kneading this dough. Before I was scared that I would overwork the dough. Not so this time. This time I kneaded that thing to high heaven and was able to get all my aggression out.

Secondly, I really pinched the seams together so that I wouldn't have the visible seams like I had with the White Sandwich Bread. I also improved my slashing technique.

Lastly, I used more than just one cup of water in the pan to create steam. The recipe called for spraying the bread in 3 minute intervals but I opted for the lazy route and placed a roasting pan with water on the bottom rack of the oven. I think I used closer to 2 1/2 to 3 cups of water. The single cup of water evaporated too fast and I don't think the bread benefited from any of the steam.

I used the recipe I found from the Brown Eyed Baker's website. Her notes on the recipe are very helpful. This recipe did produce a HUGE loaf but it was oh so very good.

Italian Bread by the Brown Eyed Baker (Adapted from Dawn’s Recipes)
Makes 1 large ginormous loaf

Ingredients:
2 cups lukewarm water (~100°F)
1 package active dry yeast
5 to 5¾ cups bread flour
1 tablespoon light brown sugar
2 tablespoons extra-virgin olive oil
2½ teaspoons salt
1 egg white, lightly beaten
2 tablespoons sesame seeds

Directions:
~Stir the yeast into ½ cup of the warm water. Let proof as you measure out the dry ingredients.

~Combine 5 cups flour, sugar and salt in the bowl of an electric mixer. Add the yeast mixture, remaining water and olive oil. Using a dough hook attachment, mix on lowest speed of electric mixer (stir setting on a KitchenAid) until a dough starts to form, adding more flour as needed.

~Knead on low speed (2 on a KitchenAid) for 7 minutes. Transfer dough to lightly floured surface and need by hand for 1 to 2 minutes, or until a smooth, firm, elastic dough is formed.

~Transfer the dough to a lightly oiled bowl and spray the dough with a thin coating of cooking spray. Wrap the bowl with plastic wrap and set aside to proof in a warm, draft-free place for 1½ hours or until doubled in size.

~Remove the plastic wrap, punch down and flatten the rounded dough with the heel of your hand. Roll the dough up tightly, sealing the seam well after each roll. The dough should be elongated and oval-shaped, with tapered and rounded (not pointed) ends.

~Preheat the oven lined with a baking stone or unglazed quarry tiles to 425°F.

~Place the dough on a baker’s peel heavily dusted with flour, or alternately on an inverted baking sheet. Allow the dough to proof, loosely covered with a floured canvas cloth, for 30 minutes, or until doubled in size.

~Brush the dough with the egg white and sprinkle the sesame seeds over the top. Using a razor blade or sharp knife, slash the dough lengthwise about 1/4-inch deep, keeping the blade at a 45 degree angle.

~Spray the dough generously with water from a water bottle and place in the oven on the baking stone. Immediately close the oven and bake for 3 minutes. Open the oven door and spray the dough again with the water bottle. Close the oven door and bake for an additional 3 minutes before spraying the dough for a third time (the spraying of the dough will ensure a crisp golden brown crust).

~Bake the dough for a total of 45 minutes, or until a hollow thud is heard when tapping the bottom of the bread. Allow the bread to cool before slicing.

recipe by: The Brown Eyed Baker

Thursday, January 1, 2009

Buckeyes

This is the first of several posts about the food I made for Christmas this year. I know that it is a little late, but having a large extended family located in different cities and a slow, crappy computer at home will slow a girl down.

I wanted to do something sweet and I originally had my eye set on making Oreo Truffles. I then learned that the OT have been done to death on food blogs and that my grandmother already made them. The next best thing was buckeyes. I found a great recipe on Brown Eyed Baker's blog.

I decided that I would have The Good Sister-In-Law come over and help me make them, since it is nice for us to spend time together and since she has never cooked anything in her entire life, it would be a good experience for her.

The recipe is fairly easy to make it just takes a while. The shaping takes most of the time and if I didn't have TGS-I-L there, I get a feeling I would have hated rolling dozens of peanut butter balls.

I decided to go with the toothpick method to dip the balls. It was faster than using a dipping fork but I did run into the problem of some of the balls falling off the toothpick. The Good Husband insists that I made the balls too large, and therefore too heavy, but I didn't like the tiny ones he proposed we make.

Once the balls were chilled, the dipping part was actually quite easy and fast. But you do need a lot of room to make sure the buckeyes don't stick together. This recipe made about 8 dozen, so you will need 2 sheet pans, at least.

This recipe produced a rich but creamy peanut butter center with a smooth chocolate shell.

Ingredients:
1 ½ cups peanut butter
6 cups powdered sugar
1 cup (2 sticks) butter, softened
½ teaspoon vanilla extract
4 cups semisweet chocolate chips
¼ cup shortening

Directions:
~Line cookie sheet with wax paper. Mix together butter, peanut butter, sugar, and vanilla with a wooden spoon in a large bowl.

~Roll dough into 1-inch balls. Set them on prepared cookie sheet and insert toothpick into each ball. Chill in freezer until hard, approximately 30 minutes.

~Melt chocolate chips and shortening over medium-high heat. Remove the pan from heat. (I used a double broiler) Dip balls in chocolate and place back on cookie sheet. Refrigerate until chocolate is set, approximately 2 hours.

~Store in airtight container in refrigerator.

recipe by: The Brown Eyed Baker