There is a lot of 100 list floating around on blogs lately. The 100 things you should eat if you are an omnivore, the 100 things you should eat if you are a vegetarian, the 100 things you want to accomplish in 1001 days.
So in that zeitgeist here is my 100 Foods I Want To Make:
Yeast Breads
~French Bread - completed
~Italian Bread - completed
~White Sandwich Bread - completed
~Parker House Rolls
~Popovers
~Donuts - completed
~Sourdough Bread - completed
~Bagels - completed
~Croissants
~Brioche
~Focaccia
Cakes
~German Chocolate
~Layered cake - completed
~Boston Cream Pie
~Cheesecake
~Flourless Cake
~Yellow cake with Chocolate Butter Cream Frosting - completed
~Cake with fondant
Cookies/Bars
~Dish Pan Cookies
~Peanut Butter Cookies - completed
~Snickerdoodles
~Brownies - completed
~Oatmeal Cookies
~Shortbread
~Palmiers
~Biscotti
Desserts
~Crème Bruleè
~Vanilla Pudding
~Chocolate Mousse
~Ice Cream - completed
~Coeur a la Crème
~Semifredo
~Sorbet - completed
~Truffles - completed
~Petit Fours
~Tiramisu - completed
~Marshmallows
~Fudge
~Caramels
Pastries
~Cheese Danish
~Éclairs
~Cream Puffs
~Turnovers
~Baklava
Pies
~Peach Pie - FAIL, will attempt again
~Double crust pie
~Lattice topped pie
~Cream Pie
~French Apple Tart
~Pecan Pie
~Tarte Tatin
~Mixed Fruit Tart
Ethnic Food
~Pad Thai
~Homemade noodles
~Canoli
~Refried Beans - completed
~Gyros
~Paella
~Summer Rolls
~Hummus
~Chicken Curry
~Sushi
~Potstickers
~Aioli
~Egg rolls
~Crab Rangoon
~Chicken Satay
Seafood
~Live lobster
~Clams
~Oysters Rockefeller
~Shrimp Scampi
~Smoked Salmon
~Crab Cakes
Entrees
~Beef Wellington
~Rack of Lamb
~Ribs
~Eggs Benedict - completed
~Homemade Sausage
~Chicken Condon Bleu
~Chicken and Noodles
~Liver and Onions
~Soufflé
~Pasta Carbonara
~Beef and Noodles - completed
~Lasagna - completed
~Quiche - completed
~Shepherd’s Pie
~Pizza - completed
~Whole Turkey
~Roasted Chicken
~Turkey Burgers
Soup and sides
~Minestrone
~Potato and Leek Soup - completed
~Stuffing - completed
~Beef Broth
~Vegetable Soup
~Gratin - completed
~Twice-Baked Potatoes
~Potato Skins - completed
~Cheese Straws
Updated: What good is it to have a list without a deadline? Well, this baby is good for one year, give a take a day. By Sept 1, I want to have finished everything on this list.

Thursday, August 28, 2008


Wednesday, August 27, 2008
Eggs and 'Taters 2
I know I have eggs and 'taters already, but it is not the typical eggs and 'taters that The Good Husband eats. That version is a "low fat" version of this original recipe.
Cooking eggs and 'taters is really more about technique than anything else. It has taken me 6 years to finally master the 'taters so they are even in the same ballpark as The Good Grandma's 'taters. TGH was raised by TGG who made every single thing from scratch and also made eggs and 'taters better than anyone else.
You would think that frying 'taters wouldn't be all that hard, right? I mean you get those little "Southern Style Hash browns" or "Country Fries" when you go to any good diner (or after a night of drinking so heavily you will eat at Denny's). How hard can it be to cube and fry up some 'taters? Well, as it has taken me six years to finally get the 'taters how they should be, I can tell you that it is harder than it looks. Kinda like html code.
The trick to making 'taters the way TGH eats is to not really fry the 'taters. Seems odd, doesn't it? You mean you don't really fry your fried 'taters? Yes. Yes, I do.
 See, I used to crank the heat up to high and wait for the cast iron skillet to get super hot and then I would fry those little suckers up until they were a deep golden brown and crunchy. But, alas, that was not the way TGH likes his eggs and 'taters. So after one weekend at TGG's I finally cracked the secret to good fried 'taters.
The trick is to keep the heat on medium and cover the skillet so that the 'taters sort of steam in the pan and only get slightly crunchy on the outside.
This is good for two reasons - 1.) It allows me to make the eggs in the same pan as soon as the 'taters are finished and 2.) I don't have to dirty up a different pan.
 Before, when I would cook the 'taters on high, I couldn't cook the eggs in the same pan. If the heat is too high and you try to fry an egg, it will all bubble up and stick to the pan. You then can't flip the egg without breaking the yolk and ruining the whole dish.
But with cooking the 'taters on a lower heat and for a longer amount of time, you can just scoop out the 'taters and drop in the eggs.
So lesson learned on how to fry 'taters. Never did I think I would have to spend so much time perfecting something so easy as eggs and 'taters. But dish 1 out of 32,165,133,494 that TGG makes that I will have to learn to perfect.
Cooking eggs and 'taters is really more about technique than anything else. It has taken me 6 years to finally master the 'taters so they are even in the same ballpark as The Good Grandma's 'taters. TGH was raised by TGG who made every single thing from scratch and also made eggs and 'taters better than anyone else.
You would think that frying 'taters wouldn't be all that hard, right? I mean you get those little "Southern Style Hash browns" or "Country Fries" when you go to any good diner (or after a night of drinking so heavily you will eat at Denny's). How hard can it be to cube and fry up some 'taters? Well, as it has taken me six years to finally get the 'taters how they should be, I can tell you that it is harder than it looks. Kinda like html code.
The trick to making 'taters the way TGH eats is to not really fry the 'taters. Seems odd, doesn't it? You mean you don't really fry your fried 'taters? Yes. Yes, I do.
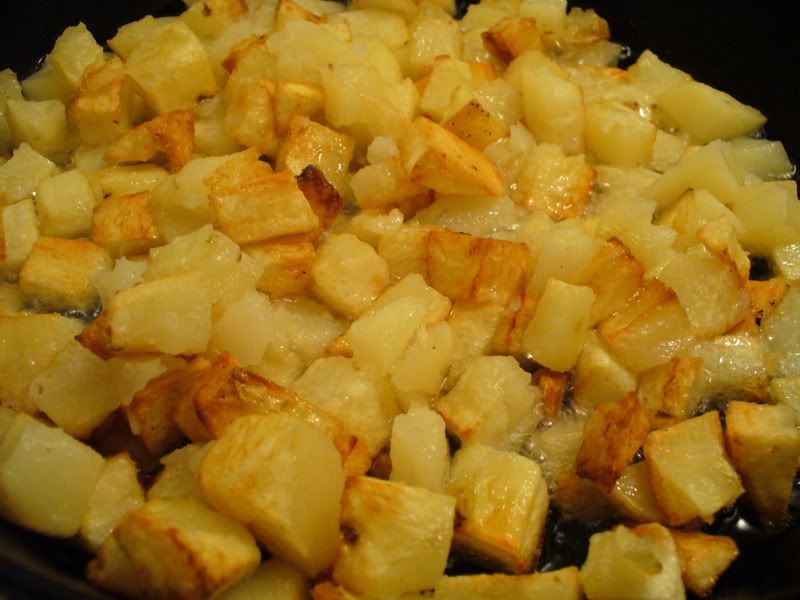 See, I used to crank the heat up to high and wait for the cast iron skillet to get super hot and then I would fry those little suckers up until they were a deep golden brown and crunchy. But, alas, that was not the way TGH likes his eggs and 'taters. So after one weekend at TGG's I finally cracked the secret to good fried 'taters.
The trick is to keep the heat on medium and cover the skillet so that the 'taters sort of steam in the pan and only get slightly crunchy on the outside.
This is good for two reasons - 1.) It allows me to make the eggs in the same pan as soon as the 'taters are finished and 2.) I don't have to dirty up a different pan.
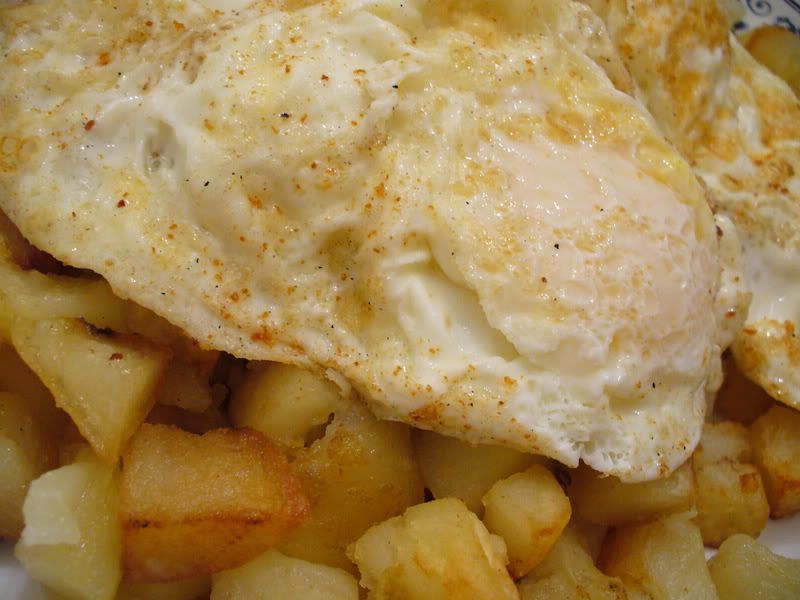 Before, when I would cook the 'taters on high, I couldn't cook the eggs in the same pan. If the heat is too high and you try to fry an egg, it will all bubble up and stick to the pan. You then can't flip the egg without breaking the yolk and ruining the whole dish.
But with cooking the 'taters on a lower heat and for a longer amount of time, you can just scoop out the 'taters and drop in the eggs.
So lesson learned on how to fry 'taters. Never did I think I would have to spend so much time perfecting something so easy as eggs and 'taters. But dish 1 out of 32,165,133,494 that TGG makes that I will have to learn to perfect.
Friday, August 22, 2008
Toast with Caramelized Sugar and Cinnamon
With all my French Bread leftover from the weekend, I decided to make a sweet treat. Lacking chocolate, the food I really craved, I decided to make cinnamon sugar toast. Not just cinnamon sugar toast, but, toast with caramelized sugar and cinnamon, pan toasted in butter. Oh heaven.

~Place the bread in the pan, allowing it to toast on each side for a few minutes.
~Sprinkle one side of the toast with cinnamon and sugar and flip it so that it will caramelize in the pan, about 1 to 2 minutes.
~Serve warm with a glass of milk or drizzle it with honey and enjoy with a cup of coffee.
recipe by: The Good Wife

Ingredients:
3 slices thin slices French Bread
Butter (there is no such thing as too much)
Sugar (there is no such thing as too much)
Cinnamon (there is no such thing as too much)
Directions:
~In a medium cast iron skillet over medium heat, melt a pats of butter.
~Place the bread in the pan, allowing it to toast on each side for a few minutes.
~Sprinkle one side of the toast with cinnamon and sugar and flip it so that it will caramelize in the pan, about 1 to 2 minutes.
~Serve warm with a glass of milk or drizzle it with honey and enjoy with a cup of coffee.
recipe by: The Good Wife
The Good Wife Guide . . . to saving money
There are several things that TGH and I are trying to do to save money. One of the areas where we try to save is our grocery bill. There are several things that you can do that are small efforts that produce big results.
~Buy in bulk, especially meat. Look for family packs of meat and separate the meat into smaller, easier to use packages. Also, if you want to go organic, you might be able to find a local farm that will sell you a whole or half cow. Visit http://www.localharvest.org/ to find a farm near you. We are lucky enough to live rurally and have beef, chicken, lamb, pork and buffalo farms near us where we can buy meat. Dollar for dollar, we usually come out a head or break even in terms of saving money on meat.
~Buy in bulk for as many things as you can. Something that will save you money is buying cheese in blocks and then shredding it on your own. Buying blocks of cheese and shredding it can save me up to $3 dollars for shredded cheese. You can freeze the cheese, up to six months, so stock up.
~Buy in bulk, especially meat. Look for family packs of meat and separate the meat into smaller, easier to use packages. Also, if you want to go organic, you might be able to find a local farm that will sell you a whole or half cow. Visit http://www.localharvest.org/ to find a farm near you. We are lucky enough to live rurally and have beef, chicken, lamb, pork and buffalo farms near us where we can buy meat. Dollar for dollar, we usually come out a head or break even in terms of saving money on meat.
~Buy in bulk for as many things as you can. Something that will save you money is buying cheese in blocks and then shredding it on your own. Buying blocks of cheese and shredding it can save me up to $3 dollars for shredded cheese. You can freeze the cheese, up to six months, so stock up.

~Use coupons and look for stores that will double or triple the coupons. There are usually two, sometimes three, stores that I will go to every week. I try and go on Saturday morning since there are less crowds and it is usually the last day for sales. I check the ad to see what is on sale and then I check to see what coupons I have. There are some websites that do this for you (The Coupon Mom and The Grocery Game) so it might be the easiest way to start.
~Always have a grocery list with you when you shop. I like to sort my list by aisle (I have shopped at the same 2 stores long enough that I know what is in what aisle). I sort my list by aisle and then any item I have a coupon for, I star. I paperclip my coupons to the back of my list so I am ready to go when I get to the checkout.
~Meal plan. Using the coupons and the sales flyer, I try to come up with all the meals we will have that week. Most people and some shows (Quick Fix Meals with Robin Miller) suggest that you eat the same kind of protein three different ways during the week but TGH and I would get burn out. So every day of the week we have a different protein: Monday - Beef, Tuesday - Pork, Wednesday - Chicken, Thursday - Pasta, Friday - Veggie/Seafood, Saturday - FREE(we usually eat out this night) and Sunday - Chicken. I find that this way helps to eliminate the feeling of eating the same thing all the time.
~The freezer is your friend. I am too scared to jar and can but freezing your veggies are a good way to save. Buy in bulk when summer produce is cheap and freeze the extras. Some good sites for more tips and hints to what you can freeze and how: http://www.extension.umn.edu/distribution/nutrition/DJ0555.html
Thursday, August 21, 2008
I'm a winner!
Joelen of Joelen's Culinary Adventrues hosts blogging events throughout the month and encouraged me to enter August's Tantalizing Tomatoes blogging event and I WON!
Woot! Woot!
This is like the time I won tickets to Sesame Street Live and a backstage pass to see Bird Bird, but because the usher sat us in the wrong section, we didn't get to go backstage. But this was way better than that.
Thanks Joelen!!!
Woot! Woot!
This is like the time I won tickets to Sesame Street Live and a backstage pass to see Bird Bird, but because the usher sat us in the wrong section, we didn't get to go backstage. But this was way better than that.
Thanks Joelen!!!
Tuesday, August 19, 2008
French Bread
I saw this recipe over at the Brown Eyed Baker and thought I would give it a go. I have never made bread before but the recipe seemed simple enough. Even though it took about 5 hours to make, most of it is resting time for the bread. Mine didn't turn out as pretty as hers but I think I did very well for a first time bread maker.
 I need to work on my slashing. I did it a little too deep so it is not so pretty. Also, my bread didn't have as many air bubbles in it as it should have but overall for my first bread making attempt, it was a complete success. I didn't burn it; you could eat it and it actually tastes like it is supposed to. So with practice, maybe I can make it better.
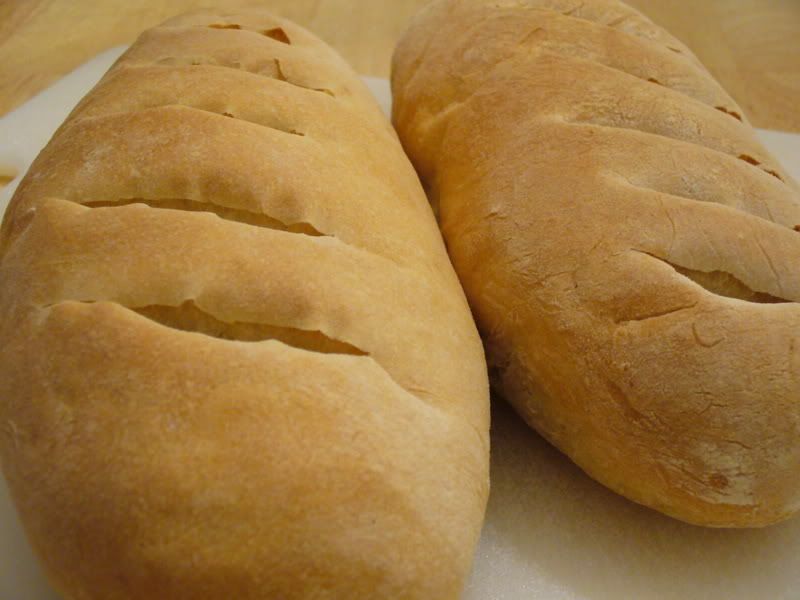 I need to work on my slashing. I did it a little too deep so it is not so pretty. Also, my bread didn't have as many air bubbles in it as it should have but overall for my first bread making attempt, it was a complete success. I didn't burn it; you could eat it and it actually tastes like it is supposed to. So with practice, maybe I can make it better.
Pain Ordinaire Careme (A Daily Loaf)
(Source: Bernard Clayton’s New Complete Book of Breads)
Yield: 4 baguettes, boules, or couronnes.
Ingredients:
6 cups bread or unbleached flour, approximately
2 packages dry yeast
2½ cups hot water (120-130 degrees F)
2 teaspoons each salt and water
Baking Sheet or Pans: 1 baking sheet, teflon or greased and sprinkled with cornmeal, or 4 baguette pans, greased.
By Hand or Mixer: (10 mins)
The early part of this preparation, beating a batter, can be done by an electric mixer. However, don’t overload a light mixer with this thick batter. If by hand, stir vigorously for an equal length of time.
Measure 3 or 4 cups of flour into the mixing bowl and add the yeast and hot water. The mixer flat beater or whisk should run without undue strain. The batter will be smooth and pull away from the sides as the gluten develops. It may also try to climb up the beaters and into the motor. If it does, push it down with a rubber scraper. Mix for 10 minutes. When about finished, dissolve the salt in the water and add to the batter. Blend for 30 seconds or more.
Kneading (10 mins):
If the machine has a dough hook, continue with it and add additional flour, ¼ cup at a time, until the dough has formed under the hook and cleans the sides of the bowl. If it is sticky and clings, add sprinkles of flour. Knead for 10 minutes.
If by hand, add additional flour to the beaten batter, ½ cup at a time, stirring first with a utensil and then working by hand. When the dough is shaggy but a solid mass, turn onto a work surface and begin kneading with an aggressive push-turn-fold motion. If the dough is sticky, toss down sprinkles of flour. Break the kneading rhythm occasionally by throwing the dough down hard against the countertop - an excellent way to encourage the development of the dough.
First Rising (2 hours):
Place the dough in a large greased bowl, cover with plastic wrap, and leave at room temperature for 2 hours. The dough will more than treble in volume - and may even be pushing against the plastic covering.
(If prepared with a new fast-rising yeast and at the recommended higher temperatures, reduce the rising times by about half.)
Second Rising (1½ hours):
Turn back the plastic wrap and turn the dough onto the work surface to knead briefly, about 3 minutes.
Return the dough to the bowl and re-cover with wax paper. Allow to rise to more than triple its volume, about 1½ hours.
Shaping (10 mins):
The dough will be light and puffy. Turn it onto the floured work surface and punch it down. Don’t be surprised if it pushes back, for it is quite resilient.
Divide the dough into as many pieces as you wish loaves. One-quarter (10 oz) of this recipe will make a baguette 22″ long and 3″ to 4″ in diameter.
Allow pieces of dough to rest for 5 minutes before shaping.
For boules or round loaves, shape the pieces into balls. Place in cloth-lined baskets (bannetons) or position directly on the baking sheet. For baguettes, roll and lengthen each dough piece under your palms to 16″ to 20″ , and 3″ to 4″ in diameter. Place in a pan or on a baking sheet or in the folds of a long cloth (couche).
This loaf’s characteristic couronne or “crown” can be made in several ways. One is to flatten the piece of dough, press a hole through the center with your thumb, and enlarge the hole with your fingers. Another is to roll a long strand 18″ to 24″ and curl into a circle, overlapping and pushing together the ends. Yet a third way is to take 2 or 3 shorter lengths of dough and join them together in a circle, not overlapping top and bottom but pressing the ends together side by side into a uniform pattern - this one will be irregular but attractive.
Third rising (1 hour):
Cover the loaves with a cloth, preferably of wool, to allow air to reach the loaves and to form a light crust. Leave at room temperature until the dough has risen to more than double its size, about 1 hour.
Preheat:
Before preheating the oven to 450 degrees F (very hot) 20 minutes before baking, place a broiler pan on the floor of the oven or bottom rack so it will be there later. Five minutes before baking, pour 1 cup hot water into the hot pan. Be careful of the burst of steam - it can burn. I use a long-handled cup to reach into the oven when I pour.
Baking (450 degrees F/25-30 mins):
Carefully move the loaves in baskets and in couches to the baking sheet. Make diagonal cuts down the lengths of the long loaves and tic-tac-toe designs on the boules.
Place on the middle shelf of the oven.
The loaves are done when a golden brown, 25 to 30 minutes. Turn one loaf over and if the bottom crust sounds hard and hollow when tapped, the loaf is done.
(If using a convection oven, reduce heat 50 degrees.)
Final step:
Place on a rack to cool.
recipe from: Brown Eyed Baker
Saturday, August 16, 2008
Poll Results
The poll is now closed and the results are in. The favorite thing about summer, in a landslid, is the days are longer. That is by far my favorite thing about summer. Where I live, it stays light out until 8 or 8:30. It makes for eating dinner on the patio so easy and fun.
Thanks everyone that voted!
Thanks everyone that voted!
Popcorn
One of my favorite snacks is popcorn. I have never been a fan of microwave popcorn so I learned how to make popcorn the old fashioned way - on the stove. The great thing about making popcorn on the stove is that you can flavor it a ton of different ways. My current favorite is Parmesan popcorn. I also like white popcorn better than yellow popcorn and always use white popcorn kernels.
 Parmesan Popcorn
 Parmesan Popcorn
Ingredients:
3 tablespoons canola or vegetable oil
1/2 cup white popcorn kernels
2 tablespoons butter
1/4 teaspoon salt
1/2 cup Parmesan cheese
Directions:
~Heat the oil in a large pot with a lid set over medium-high heat. I use my heavy bottom Dutch Oven.
~Pour in popcorn kernels and sprinkle with the salt. As soon as the kernels start to pop, shake the pan back and forth across the burner constantly until the popping slows down. Listen until the pops are about 2 seconds apart, remove from the heat and pour into a serving bowl.
~Add the butter to the pan and allow it to melt. Pour the melted butter over the popcorn and toss to coat. Add the Parmesan cheese to the hot popcorn and toss to coat. Serve warm.
Variations:
Minus the Parmesan cheese, the previous is my basic popcorn recipe. All the variations use it as a base and the different seasonings should be added to the popcorn after it has popped but is still warm.
Spicy Cowboy Popcorn
Ingredients:
1 recipe The Good Wife basic popcorn
1/2 tablespoon chili powder
1 teaspoon cumin powder
1 teaspoon garlic powder
1/2 teaspoon red pepper flakes
1/4 cup pepper jack cheese
Directions:
~Pop popcorn according to recipe above but do not add the melted butter to the popped popcorn.
~Melt the 2 tablespoons of butter in a small bowl. Add the chili, cumin and garlic powder to the butter and stir to combine. Pour over the popcorn and toss to coat. Add the pepper jack cheese and serve warm.
Very Italian Popcorn
Ingredients:
1 recipe The Good Wife basic popcorn
3 teaspoons dried oregano
1 teaspoon dried basil
1 teaspoon garlic powder
1/2 teaspoon onion powder
1 recipe The Good Wife basic popcorn
3 teaspoons dried oregano
1 teaspoon dried basil
1 teaspoon garlic powder
1/2 teaspoon onion powder
1/2 teaspoon dried thyme
1/2 teaspoon dried rosemary
1/4 cup Parmesan cheese
1/4 cup Parmesan cheese
Directions:
~Pop popcorn according to recipe above but do not add the melted butter to the popped popcorn.
~Melt the 2 tablespoons of butter in a small bowl. Add all the seasonings to the butter and stir to combine. Pour over the popcorn and toss to coat. Add the Parmesan cheese and serve warm.
~Pop popcorn according to recipe above but do not add the melted butter to the popped popcorn.
~Melt the 2 tablespoons of butter in a small bowl. Add all the seasonings to the butter and stir to combine. Pour over the popcorn and toss to coat. Add the Parmesan cheese and serve warm.
recipes by: the good wife
Friday, August 15, 2008
Ingredient of the Week . . . Corn
The ingredient I choose this week is corn. I love corn. I think I could eat it everyday. But regular old corn can get boring. So the two dishes I made this week were Grilled Corn and Scalloped Corn.
 Grilled Corn
Grilled corn is really simple. Just take an ear of fresh corn on the cob and drizzle it with oil or butter, salt, pepper and then grill until charred. Leave the husk on the corn when you grill it. Just peel back the husk, remove the silk and then spread with oil or butter.
The great thing about grilled corn is that you can season it a ton of different ways. You can rub some crushed garlic and cumin on it, grill it and then top with lime juice and Parmesan cheese. Or you could use some rosemary, thyme, garlic and lemon juice.
recipe by: The Good Wife
 Scalloped Corn
Ingredients:
1/2 cup chopped onion
2 tablespoons butter
1 package frozen whole kernel corn, thawed
1/4 teaspoon salt
2 eggs, slightly beaten
1 can cream-style corn
1 cup milk
3/4 cup coarsely crushed rich round crackers (about 20 crackers)
1/2 cup shredded cheddar cheese
Directions:
~In a medium saucepan cook onion in butter until tender. Add in thawed corn and salt. Remove from heat.
~In a large bowl stir together the eggs, cream-style corn, milk, and crushed crackers. Stir in the corn and onion mixture. Transfer to an greased 2-quart baking dish.
~Bake, uncovered, in a 325 degree F oven for 35 to 40 minutes or until center appears set. Top with cheese. Let stand for about 15 minutes before serving.
recipe modified from: better homes and gardens
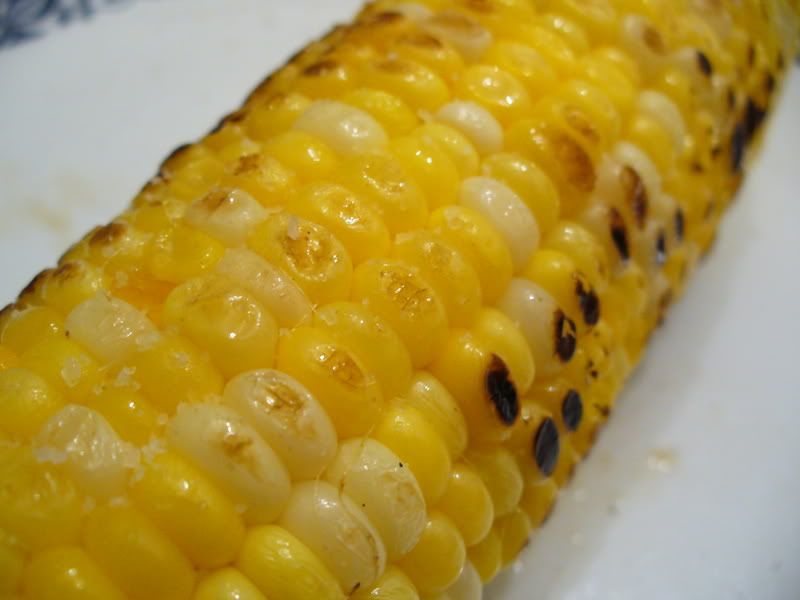 Grilled Corn
Grilled corn is really simple. Just take an ear of fresh corn on the cob and drizzle it with oil or butter, salt, pepper and then grill until charred. Leave the husk on the corn when you grill it. Just peel back the husk, remove the silk and then spread with oil or butter.
The great thing about grilled corn is that you can season it a ton of different ways. You can rub some crushed garlic and cumin on it, grill it and then top with lime juice and Parmesan cheese. Or you could use some rosemary, thyme, garlic and lemon juice.
recipe by: The Good Wife
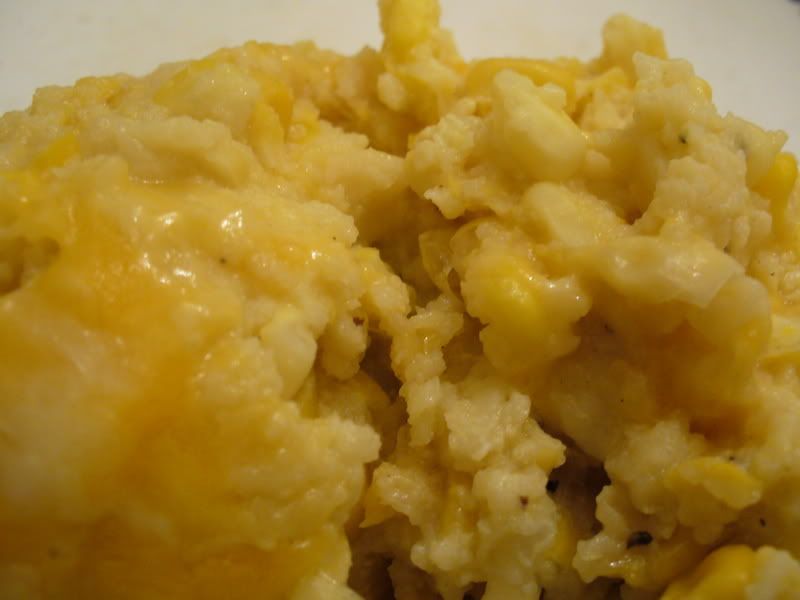 Scalloped Corn
Ingredients:
1/2 cup chopped onion
2 tablespoons butter
1 package frozen whole kernel corn, thawed
1/4 teaspoon salt
2 eggs, slightly beaten
1 can cream-style corn
1 cup milk
3/4 cup coarsely crushed rich round crackers (about 20 crackers)
1/2 cup shredded cheddar cheese
Directions:
~In a medium saucepan cook onion in butter until tender. Add in thawed corn and salt. Remove from heat.
~In a large bowl stir together the eggs, cream-style corn, milk, and crushed crackers. Stir in the corn and onion mixture. Transfer to an greased 2-quart baking dish.
~Bake, uncovered, in a 325 degree F oven for 35 to 40 minutes or until center appears set. Top with cheese. Let stand for about 15 minutes before serving.
recipe modified from: better homes and gardens
Subscribe to:
Posts (Atom)