Tuesday, September 30, 2008

Fall Sugar Cookies

I love fall. It is my favorite season. I originally wanted to get married in the fall - October 16, actually - but it didn't work out that way. I love everything there is about fall - the colors, the smells, the cool temperatures. I love going to the apple orchard, going to the pumpkin patch, drinking apple cider and sitting out by a fire on the cool nights.

I also get incredibly giddy at the thought of making sugar cookies. I used to make sugar cookies for Christmas each year with my maternal grandmother and my cousin. But the last time we made them, my cousin and I got into a flour fight and Nana had had enough.

A few years ago, I saw these mini fall cookie cutters in the craft store and had to have them. This is the first year that I actually used them since my confidence in cookie making has grow tremendously. I was every excited that I would have all day Saturday to myself to make and decorate these cookies. The Good Husband was off, like most other Good Husbands in the fall, setting up a deer stand to hunt. I stay out of those manly things and focus on my time in the kitchen.

I must say that I am so incredibly pleased with these cookies that I am almost ashamed. They just turned out so pretty and I cannot help but beam with pride. They all look so beautiful and I remember how much I love the color orange. Not in that annoying Rachel Ray everything-I-own-is-orange, but that ah-I-see-how-beautiful-a-little-orange-is-every-once-and-a-while.

My small shout-out to my favorite holiday, Halloween

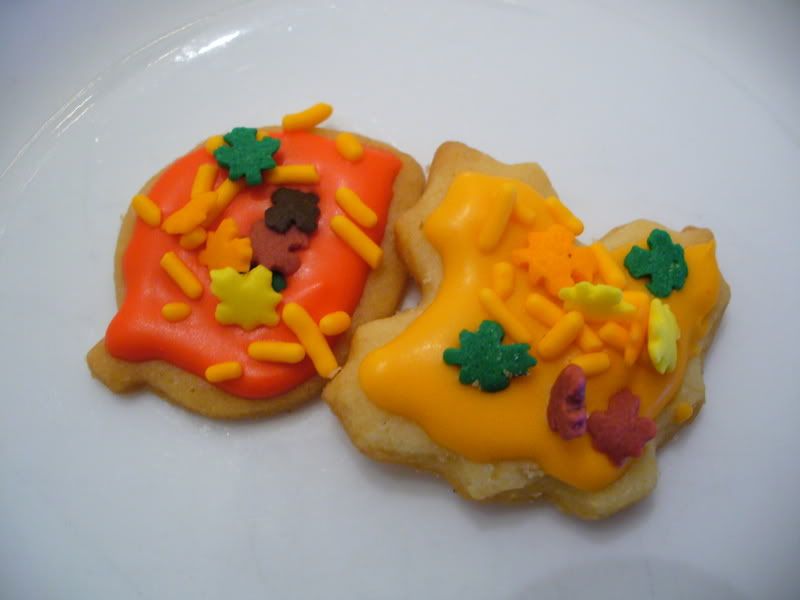
Pumpkins Aspen and Maple leaves


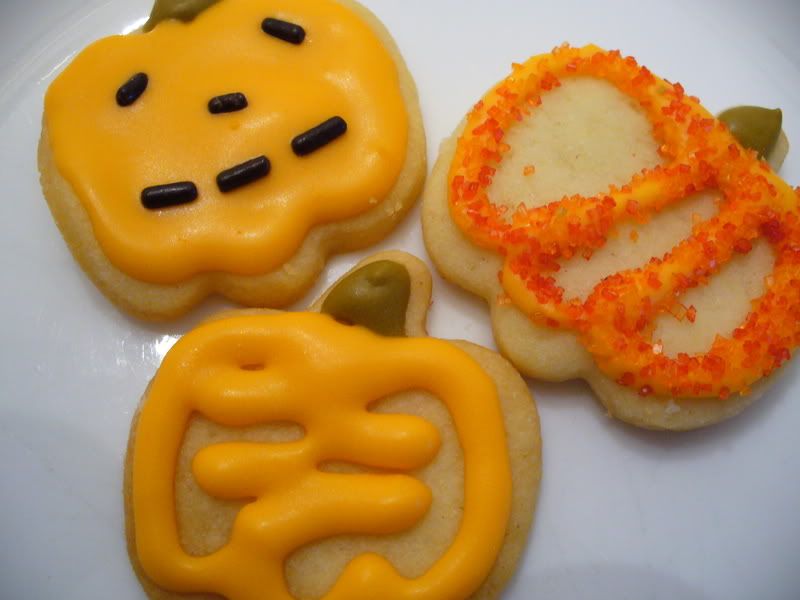
Apple Canadian leaves

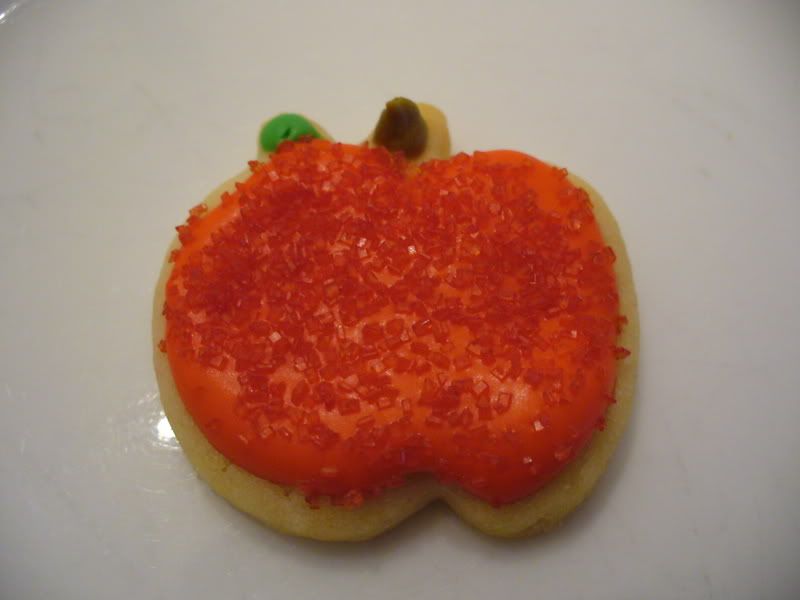
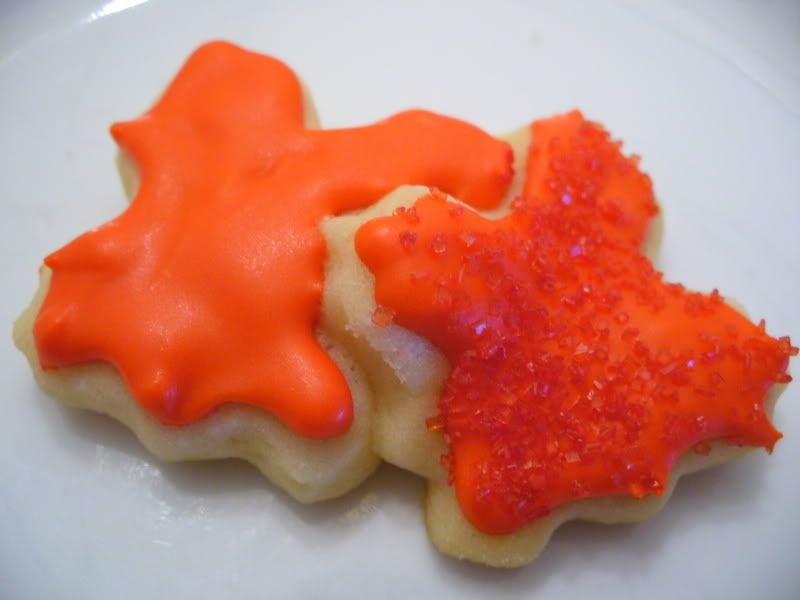
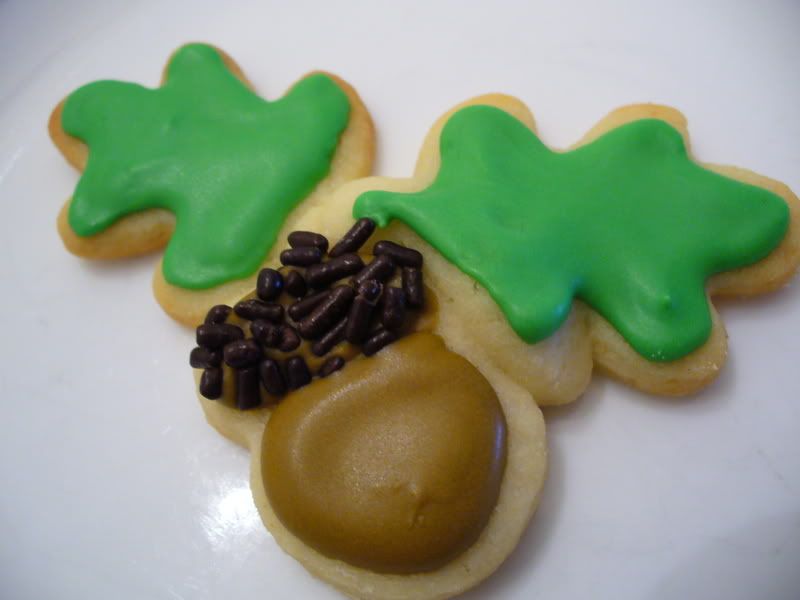
More Aspen leaves Acorn and Oak leaves

This was the first time that I used Royal Icing to decorate the cookies. I think I made the icing a little thick but they turned out fine.

I used Martha Stewart's Signature Sugar Cookie recipe and Royal Icing recipe using egg whites.

Ingredients:
2 cups all-purpose flour
1/4 teaspoon salt
1/2 teaspoon baking powder
1/2 cup (1 stick) unsalted butter
1 cup sugar
1 large egg, lightly beaten
2 tablespoons brandy, or milk
1/2 teaspoon pure vanilla extract
Royal Icing for Sugar Cookies, see below

Directions:
~Whisk together flour, salt, and baking powder in a medium bowl. In the bowl of an electric mixer fitted with the paddle attachment, cream butter and sugar; add dry ingredients, and mix until incorporated. With mixer running, add egg, brandy (or milk), and vanilla; mix until incorporated.

~Transfer dough to a work surface. Shape into 2 discs, cover with plastic wrap, and refrigerate for at least 1 hour.

~Preheat oven to 350 degrees. Line baking sheets with nonstick baking mats or parchment paper; set aside.

~On a lightly floured work surface, roll out dough to 1/8-inch thickness. Cut into desired shapes, and transfer to prepared baking sheets, leaving an inch in between. Leftover dough can be rolled and cut once more. Bake until lightly golden, about 10 minutes; do not allow to brown. Transfer to wire racks to cool.

~Decorate with Royal Icing and assorted sprinkles, optional.

Royal Icing
Ingredients:
1 box confectioners' sugar (1 pound)
2 large egg whites
(1 tablespoon vanilla extract) - I added this for flavor and to thin the icing

Directions:
~In the bowl of an electric mixer fitted with the paddle attachment, combine sugar and egg whites. Mixing on low speed, add a scant 1/2 cup water and the vanilla extract. For a thinner consistency, usually used for flooding, add more water. A thicker consistency is generally used for outlining and adding details. Mix until icing holds a ribbonlike trail on the surface of the mixture for 5 seconds when you raise the paddle.

NOTE: I forgot to add the water to the Royal Icing and it is the reason the icing was too thick. I also didn't have a piping and a flood icing for each color since I only had one bag I used to pipe the icing. If you think your icing is too thick then you can add some water or more extract. If it looks too thin, you can add more powdered sugar. It is really a estimate of the amount of ingredients you need to make a good consistency.

I also just used a Ziplock bag with the corner cut off instead of a pastry bag to do the piping. Very Aunt Sandy of me, but I don't own a pastry bag, yet. I also used gel food coloring for the first time to make the icing. It worked wonderfully except that I put a little too much red gel in that batch and it tasted a little off. Other than that I had no problems

recipes by: Martha Stewart

Friday, September 26, 2008

Autumn Turkey Sandwich

One of the dishes that is so simple to make and yet so versatile is sandwiches. This idea came to me as I was making my Harvest Apple Salad below. I love the combination of savory and sweet with apples. For some reason I wasn't able to get a good picture that captured just how yummy this sandwich is. This will have to do.
Ingredients:
Italian bread
Thick cut deli smoked turkey
Provolone cheese
Granny Smith apple, sliced
Apple butter

Directions:
~Spread the apple butter on the sliced bread and then layer with the cheese, turkey and apples.

~In a skillet over medium low heat, toast the sandwich until browned on both sides and the cheese is melted. You can also use a panini maker or sandwich press. Serve warm.

recipe by: The Good Wife

Thursday, September 25, 2008

Ingredient of the Week . . . Spinach

The ingredient I choose for this week is something I normally don't work with a lot. Like most kids I was never a big fan of spinach and that has translated into my adult life as well. I have only ever had spinach in two forms - leaf and canned.

I remember the first time I ever had spinach. I was in first grade and my school was having a lunch with your parents day. My mom took time off work to come and eat lunch with me. Already having to deal with sitting at a little table and chair, my mom was then also faced with the daunting task of finding something in the school cafeteria she could eat. Somehow she managed to find a salad that had leaf spinach in it. She gave me a bite and told me what it was. And it was good.

Flash forward two weeks and I was over at my paternal grandmother's house. They were getting ready to fix dinner and asked me what vegetable I wanted. I asked if they had any spinach and my grandmother seemed very happy that I liked spinach. That is until I was presented with a plate of green leafy snot. I stood there confused with a look of horrid disgust on my face.

"What is that?" I asked.

"Spinach," I was told.

"That's not spinach," I replied, trying to clam my gap reflex.

"Yes it is."

"No it is not! Spinach is leaves! That is not spinach!" I started to cry.

"Leaves? Leaves?! What are you talking about? Leaves? This is spinach and since you wanted it, you have to eat it"

Crying. "No."

And that was the last time I remember having dinner at my paternal grandmothers. I never did eat that damn spinach and I am sure my grandmother was pissed about the 89 cents I wasted, but I was convinced they were trying to feed me something other than spinach and were lying about it.

But I have discovered, even if I don't particularly like the taste of cooked spinach, nothing improves on flavor like butter, cream and garlic. Thus, I present: Spinach Gratin.

Ingredients:
4 tablespoons unsalted butter
4 cups chopped yellow onions, I used 4 large shallots, though since TGH is not a big onion fan
2 cloves garlic, minced
1/4 cup flour
1/4 teaspoon grated nutmeg
1 cup heavy cream
2 cups milk
3 pounds frozen chopped spinach, defrosted (5 (10-ounce) packages)
1 cup freshly grated Parmesan cheese
1 tablespoon kosher salt
1/2 teaspoon freshly ground black pepper
1/2 cup grated Gruyere cheese, I used Swiss instead

Directions:
~Preheat the oven to 425 degrees F.

~Melt the butter in a heavy-bottomed saute pan over medium heat. Add the onions (or shallots) and garlic and saute until translucent, about 15 minutes. Add the flour and nutmeg and cook, stirring, for 2 more minutes. Add the cream and milk and cook until thickened. Squeeze as much liquid as possible from the spinach (to do this I use a clean kitchen towel. I place the spinach in the middle and bring all four corners of the towel together and ring the water out of the spinach) and add the spinach to the sauce. Add 1/2 cup of the Parmesan cheese and mix well. Season, to taste, with salt and pepper.

~Transfer the spinach to a baking dish and sprinkle the remaining 1/2 cup Parmesan and the Gruyere on top. Bake for 20 minutes until hot and bubbly. Serve hot.

recipe by: Ina Garten

The next dish I used spinach in was a nice simple salad, since leaf spinach is still my favorite. When I worked at a grocery store, one of the perks was getting to read all the magazines when it was slow. I planned most of my wedding that way. Thank you Martha Stewart! Aside from all the gossip I was able to catch up on, I loved all the little recipe books. I have a ton of recipes I wrote on sales receipts that are now stored in my recipe binder. This salad I remember seeing in a magazine but I didn't write it down, since I thought it was simple enough.

Needless to say I think I have modified it beyond the original version. So I just call this salad Harvest Apple Salad.

Ingredients:
1 large sweet apple, chopped, I use Pink Lady apples since I think they are the best ever
8 oz blue cheese crumbles
1 cup walnut halves
2 cups of leaf spinach
1 1-2 cups honey mustard citrus vinaigrette (recipe to follow)

Directions:
~Combine all the ingredients and toss with dressing. Serve as 4 side salads or 2 entree salads.

Honey Mustard Citrus Vinaigrette

Ingredients:
1/2 cup white vinegar
1 tablespoon honey
1 tablespoon prepared Dijon-style mustard
1 tablespoon orange juice
1/2 teaspoon ground black pepper
2 teaspoons salt
2 teaspoons minced garlic
1 cup vegetable oil

Directions:
~Whisk together all the ingredients in a small bowl and pour over desired salad.

recipe by: The Good Wife

Wednesday, September 24, 2008

The Good Wife Potato Salad

The Good Husband called me from work yesterday afternoon to say his company was having a last minute potluck today and he wanted me to bring a dish. My go-to potluck dish is potato salad. It is one of those dishes that I love to make but don't really care to eat. I can eat a small dish of potato salad but it is not my all time favorite. Since I am not tempted to eat most of it as I am making it, it makes for a big dish to bring to any potluck.

But I make this version, The Good Wife Potato Salad, for family get togethers and it is always a hit. Regular potato salad can be kinda blah so I spice mine up a bit. Note: This recipe is for a large serving for a get together. You can easily cut it in half.

Ingredients:
10 large potatoes, I used red
4 eggs
4 celery stalks, chopped
1 medium onion, chopped
1/2 tablespoon celery seed
1/2 cup mustard
2 cups mayonnaise, I use a combination of both real mayonnaise and Miracle Whip
4 slices of thick cut bacon
1 bunch of green onion, chopped
Paprika
Salt and pepper to taste

Directions:
~Bring a large pot of water to a boil. Add 2 large pinches of salt. Add potatoes and cook until tender but still firm, about 15 minutes. Drain, cool, peel and chop.

~In a skillet over medium heat, brown the bacon. When browned, remove from pan, drain on paper towels and crumble. Set aside.

~While you peel the potatoes, place eggs in a saucepan and cover with cold water. Bring water to a boil; cover and boil eggs for 10 to 12 minutes. Remove from water, cool, peel and chop, reserving one egg for garnish.

~In a large bowl, combine the potatoes, 3 of the chopped eggs, celery, onion, celery seed, mustard, pepper, salt and mayonnaise. Mix well to combine.

~To garnish, slice the hard boiled egg into thin slices. Arrange the slices around the edges of the bowl, evenly spacing them. Sprinkle the bacon crumbles over the top and lightly dust the top with paprika. Finish the dish with the chopped green onion. Let sit overnight to combine the flavors.

Meatloaf

As I promised you yesterday, I present to you the most housewifely dish ever: Meatloaf.

Meatloaf is one of those dishes that always feels like Sunday. It does take a while to cook, but not all day, so you can have meatloaf whenever. Meatloaf is also one of those dishes where once you have the basic recipe down, you can modify it in any number of ways. Since I am a cook without a cookbook type of girl, I usually just throw stuff in a bowl and see how it comes out. Every damn time I make meatloaf it tastes different. Every. Damn. Time.

Ingredients:
1 cup bread crumbs, I used Italian seasoned
2/3 cup milk
1 medium onion, finely chopped
3 garlic cloves, minced
2 medium celery rib, finely chopped
2 medium carrot, finely chopped
2 tablespoons unsalted butter
2 tablespoons Worcestershire sauce
1/4 teaspoon ground allspice
1/2 tablespoon dried basil
1/2 tablespoon dried oregano
1 1/2 lb ground beef chuck
1/2 lb ground pork
2 large eggs
1/3 cup finely chopped flat-leaf parsley
2/3 cups ketchup
1/4 cup brown sugar

Directions:
~Preheat oven to 350 degrees.

~Cook onion, garlic, celery and carrot in butter in a large skillet over medium heat until tender, about 10 minutes. Remove from heat and stir in Worcestershire sauce, allspice, basil, oregano and salt and pepper to taste.

~Combine the vegetable mixture with the bread crumbs and add the beef, pork, eggs, milk and parsley and mix together with your hands.

~Shape the mixture into a loaf and place on a broiler pan. Coat the top of the meatloaf with the ketchup and sprinkle with brown sugar.

~Bake for 1 hour. Let stand 10 minutes before serving.

Tuesday, September 23, 2008

Sarah Palin or Am I Still A Feminist

One of the goals of my blog is to share some political musings I have as The Good Wife. As TGW I have to reconcile my life and work as both a die hard feminist and a wife who enjoys cooking and cleaning. Most of the time the task is easy. I mean, isn't being a feminist all about choices and I made my choice to like activities that are ascribed to traditional gender roles? So while I do enjoy being a wife, I know that it is not all that I am and I am not bound by my apron strings.

But then there are days when I question everything I know about being a feminist and a woman. The day of my latest struggle began on August 29. This was the day that Sen. John McCain announced Gov. Sarah Palin as his choice for Vice President.

You would think that as a feminist I would rejoice in this news. I mean we could actually have a woman Vice President! But after the first two seconds of something like joy, a deer-in-the-headlights panic set over me and I have not been able to shake it since. It has been growing like a tumor as I struggle to define how I deal with Palin.

How could it be that a feminist would find panic in the nomination of Palin?

This article explains it rather well for me. Zombie Feminists of the RNC

"In this strange new pro-woman tableau, feminism -- a word that is being used all over the country with regard to Palin's potential power -- means voting for someone who would limit reproductive control, access to healthcare and funding for places like Covenant House Alaska, an organization that helps unwed teen mothers. It means cheering someone who allowed women to be charged for their rape kits while she was mayor of Wasilla, who supports the teaching of creationism alongside evolution, who has inquired locally about the possibility of using her position to ban children's books from the public library, who does not support the teaching of sex education.

In this 'Handmaid's Tale'-inflected universe, in which femininity is worshipped but females will be denied rights, CNBC pundit
Donny Deutsch tells us that we're witnessing 'a new creation ... of the feminist ideal,' the feminism being so ideal because instead of being voiced by hairy old bats with unattractive ideas about intellect and economy and politics and power, it's now embodied by a woman who, according to Deutsch, does what Hillary Clinton did not: 'put a skirt on.' 'I want her watching my kids,' says Deutsch. 'I want her laying next to me in bed.'"

So if this is the case, I am now labeling myself something that is turning into the exact opposite of what I believe in. Do we need a new word for feminism? Womynism?

There is just something about Palin's nomination that rubs me the wrong way. Is it the fee she charged sexual assault victims for rape kits? Is it the rhetorical questions about book banning? Is the the blatant pandering to the vagina vote? Was it her mocking of the sexism Clinton faced in her primary bid, saying Clinton was whining? Something about this woman just leaves me panicked and fearful.

Some will say that the media is being sexist towards Palin. This is true - to a point. But this is not the sexism we saw with Clinton.


Not quite the same is it?

That is not to say that Palin hasn't faced her own sexist attacks in the media. She has.

But her support of groups like Feminists for Life, abstinence only sex education and her opposition to abortion even in the cases of rape and incest (although she does get some points for being consistent) just makes my vagina sad.


I look at these last weeks leading up to the election with a kind of fear and depression and on the other hand, hope and pride. I hope that I can turn most of my attention to the economy, or saving and looking for a new house, or making some killer sugar cookies for fall. I hope this growing tumor will turn out to be benign and all will be fine.

And to counter this post, tomorrow I will post about the most housewifely dishes of all time: meatloaf.

Wednesday, September 17, 2008

Tostadas

I love Mexican food. No, make that American Mexican (AM) food because even though I know someone's abuela makes killer corn tortillas, I am not convinced that Tostadas are really a genuine Mexican food. I could be wrong and someone is free to correct me. But I get a feeling Tostadas are like Crab Rangoon. Tasty but nothing like what you would find in China.

But back to AM food. Besides Italian, AM is the easiest type of food to cook, I find. Some chili, onion and garlic powder, oregano and cumin makes for a mean AM dish. And, just look at how pretty everything is.

They say you eat with your eyes first (this is an important thing to remember when picking out place settings, actually, because you never want your plates to compete with the food. This is why most restaurants have white plates. After TGH and I move, I will break out my all white plates. For now, I make due) and it is true. Nothing is more beautiful to me than a rainbow of colors on a plate. Ah.
Tostadas
Ingredients:
1 pound ground beef
1 tablespoon chili powder
1/4 teaspoon garlic powder
1/4 teaspoon onion powder
1/4 teaspoon crushed red pepper flakes
1/4 teaspoon dried oregano
1/2 teaspoon paprika
1 1/2 teaspoons ground cumin
1 teaspoon sea salt
1 teaspoon black pepper
2/3 cup of water
12 Tostadas
1 can of refried beans, I used vegetarian refried beans
1 small head of lettuce, shredded
1 medium tomato, seeded and chopped
2 cups of shredded cheese, I used mild cheddar
Sour cream
Taco Sauce
Salsa

Directions:
~Heat the oven to 325 degrees and bake the Tostada shells in a single layer on a baking sheet for 6 to 7 minutes.

~Meanwhile, brown the beef and drain off the fat. Combine all of the spices and the water. Bring the mixture to a boil and reduce heat to a simmer. Cook for 5 minutes or until the mixture has thicken and most of the water has evaporated.

To assemble the Tostadas:
~Heat the refried beans in a microwave safe bowl on high to 2 1/2 minutes.

~Spread a thin layer of beans on the Tostada shell. Top with the seasoned meat, taco sauce, lettuces, cheese, tomato and sour cream.

~Serve with a side of Spanish Rice and Refried Beans topped with Pepper Jack cheese (recipe to follow).

This recipe is very easy to make vegetarian. Just either replace the ground beef with tofu crumbles or eliminate it completely.

recipe by: The Good Wife

Spanish Rice

Photo above.

Ingredients:
1/2 tablespoon onion powder
1/2 cup chopped green sweet pepper, I omitted because I was lazy
1/2 teaspoon garlic powder
1 tablespoon cooking oil
1 teaspoon chili powder
1 28-ounce can tomatoes, cut up
1 cup water
3/4 cup uncooked long grain rice
1 4-ounce can diced green chile peppers, undrained, I omitted because I was lazy
1/4 teaspoon salt
1/8 teaspoon black pepper
1/2 cup shredded Pepper Jack cheese

Directions:
~In a large skillet combine oil, undrained tomatoes, water, rice, chile peppers, salt, pepper, onion powder, garlic powder and, if using, green onion.

~Bring to boiling and reduce heat. Simmer, covered, about 20 minutes or until rice is tender and most of the liquid is absorbed.

~Sprinkle with the shredded cheese.

recipe modified from: Better Homes and Gardens

Tuesday, September 16, 2008

Ingredient of the Week . . . Beef Roast

Now that the days are getting chillier, soups and stews are on the menu. In last week's Ingredient of the Week, I highlighted ground beef and made Chili. That ushered in the beginning of fall menu at The Good Wife's house. This week's ingredient is beef roast, namely Boneless Beef Chuck Roast. The easiest and most tasty soup I make with BBCR is Vegetable Beef Soup.

Again this is one of those dishes I had at The Good Grandma's. It was full of veggies that I normally don't eat and don't really like that much (I mean, Lima Beans anyone?) but with everything else in the soup, it was super tasty and I didn't mind the beans that much.

A tip before you start: The recipe that follows makes almost 3 gallons of soup. I have a large stock pot that will hold that much soup but if you don't you can easily cut the recipe in half.

Vegetable Beef Soup
Ingredients:

3 pounds boneless beef chuck roast, trimmed and cubed
6 cans of beef broth
2 cans of stewed tomatoes
2 medium turnips, peeled and cubed
2 pounds small red potatoes, scrubbed and cubed
4 stalks of celery, diced (leaves too)
4 carrots, peeled and diced
1 small head of cabbage, shredded
2 cans of corn (I use one can of golden corn kernels and one can of white corn kernels)
2 cans of green beans
2 cans of peas
1 can of Lima beans ('cos, really, who likes Lima Beans?)
2 tablespoons dried basil
2 tablespoons dried oregano
1 tablespoon onion powder
1 tablespoon garlic powder

Directions:
~Cook the beef in a slow cooker over low heat for 4 to 5 hours.

~Add the meat, juices and all, to the stock pot and add the beef broth and tomatoes. Bring the mixture to a boil and then lower to a shimmer. Add the potatoes, turnips, celery and carrots. Cook for ten minutes.

~Add all of the remaining ingredients and simmer, covered, for 20 minutes.

recipe by: The Good Wife


This Ingredient of the Week should really be about the cooking tools as much as it is about the food. Both of the dishes were made, at least partly, with the slow cooker.

I don't use my slow cooker that much. I kind of forget I have it tucked away in my small kitchen, hiding behind my mixing bowls. But when I use it, I remember how great it is and use it twice the week I remember I have it.

Italian Beef was one of the plate choices we had at our wedding, so it will always have a special place in my heart. It is super to make as well, slow cooker notwithstanding.

Italian Beef
Ingredients:
2 pounds boneless beef chuck roast
1 package of dry Italian Dressing Mix
1/2 cup Italian dressing
1/2 cup banana peppers, juice and peppers (optional) - The Good Husband can't eat anything spicy, so we hold the peppers
1 package of Kaiser Rolls

Directions:
~Pour 1/2 cup of Italian dressing in the bottom of the slow cooker. Place the beef roast in the cooker, turning to coat all sides. Sprinkle the Italian Dressing over the beef, making sure all of the roast is covered. Top with the peppers.

~Cook on low for 6 to 8 hours. Before serving, shred the meat with two forks and stir to combine the juices.

~Serve on Kaiser Rolls with a side of oven fries (recipe to follow).

I like to top my Italian beef with banana peppers (I do like all things spicy), Pepper Jack cheese and horseradish. TGH likes his with ketchup and pickles.

recipe by: The Good Wife

Oven Fries

For photo, click here.

Ingredients:
4 large baking potatoes
Canola or other light oil, about 1/2 cup
Salt to taste
Seasoned salt to taste

Directions:
~Slice the potatoes into 1/4 inch thick slices and then each slice into 3 strips.

~Place the strips in a bowl of cold water and allow them to soak for 10 minutes.

~Heat the oven to 450 degrees.

~Drain the potatoes and pat dry with a lean kitchen towel. Toss the potatoes with the oil, salt and seasoned salt. Arrange the potatoes in a single layer on the baking sheet and bake for 40 minutes, stirring every 15 minutes.

recipe by: The Good Wife

Sunday, September 14, 2008

Potato Skins

One of the things on my 100 Foods I Want to Make is potato skins. This dish was no doubt made popular by all the casual dining chain restaurants that have taken the place of home cooked food in Middle America. I can maybe see some housewife in the 50s creating this dish out of boredom with having mashed potatoes over and over again, but I doubt it. I get a feeling that this dish might have been popular at bars, where the skins of the potatoes would have been left over from making french fries. But I am no food anthropologist, so that is just my uneducated guess.

The Good Husband loves 'tater skins and it is one of the only dishes where he will eat sour cream (he doesn't know I put sour cream in the mashed potatoes. Don't tell him, ok?). So here is my first attempt at making them.
'Tater Skins
Ingredients:
4 large Russet potatoes, scrubbed
6 strips of bacon
3/4 cups of shredded cheese, I used CoJack cheese
1/2 cup of sour cream
2 green onions, sliced, I didn't have any so I skipped this

Directions:
~Scrub the potatoes and cut them into thick slices. Bake on a large baking sheet in a preheated 350 degree oven for 20 minutes until the slices are almost tender.

~While the potatoes bake, brown the bacon, remove, cool and break into crumbles.

~Remove the potatoes from the oven and in a large skillet over medium high heat, heat 2 tablespoons of canola oil. Place the potato slices in the pan and fry until golden brown on each side.

~Remove the potato slices from the pan and allow them to drain on a plate lined with several paper towels.

~Place the crisp potatoes back on the baking sheet and top with the cheese and bacon. Bake for 5 minutes or until the cheese is melted.

~Serve with sour cream.

recipe by: The Good Wife

Trip to the Farmer's Market 3

The season has changed and so has the Farmer's Market. Gone are the beautiful ears of sweet corn and the juicy cantaloupe, replaced by mums and pumpkins. The crowd has gotten smaller too. The bountiful summer harvest that lent itself so well to light, cool dinners has been replaced by products that lend themselves to hearty, warm meals.

I couldn't resist the homemade egg noodles of a first-time vendor. Until I can make my own, these noodles will be great in chicken and noodles. I also bought some Illinois wine. I had wanted some Chardonnay but they were all out. Since I am not the biggest fan of reds, I thought the Blush would be a good choice.
With the exception of the noodles, my haul provided for a great simple supper. I made Crash Hot Potatoes by the Pioneer Woman, green beans and Parmesan Crusted Chicken (recipe to follow), followed by a nice glass of wine. The wine turned out to be a good choice. It was nice and mild but not too sweet with nice undertones of berries.Parmesan Crusted Chicken
Ingredients:
2 chicken breasts
1 cup of flour
1 egg
1/4 cup of milk
1 cup of Italian seasoned bread crumbs
1/2 cup Parmesan cheese

Directions:
~Form an assembly line to bread the chicken with three large, shallow bowls. In the first bowl, place the flour and add salt and pepper to taste. In the middle bowl, add the egg and milk and whisk to combine. In the last bowl, add the bread crumbs and the cheese.

~To bread the chicken, dredge it in the flour first, making sure you shake off the excess flour, but also making sure all sides are covered. Next, pass the chicken through the egg mixture, making sure all sides are covered. Hold the chicken over the bowl to allow the excess egg mixture to fall off. Finally place the chicken in the bowl with the bread crumbs and cheese. Press the chicken lightly into the bread crumbs and turn it to coat fully.

~In a large non-stick skillet over medium high heat, heat 2 tablespoons of oil and gently place the chicken in the pan. Cook for 3-4 minutes per side or until each side is a nice golden brown. Turn the heat down to medium and allow the chicken to cook for another 5 minutes per side or until the chicken is cooked through.

~Serve warm. You can also top with a drizzle of extra virgin olive oil and some Parmesan cheese.

recipe by: The Good Wife

Friday, September 12, 2008

Cowboy Sushi

I know that foods differ by region, ethnicity and family. This is one of those dishes that seem to be a regional favorite and family specific. This little delight is something I was introduced to the first time I went to a family reunion for The Good Husband.

If you can't tell what it is, it is cream cheese, Budding Beef and pickles. My family served something similar but our version was cream cheese, salami and green onion. This is a popular appetizer 'round our family and I have seen uncles fight over the last pickle.

This is a relatively new dish to me and no one seemed to have a name for it. I have heard it called "the pickle dish" and even "oh, you know, those things". So I figured since this might be the only time this dish has been on a food blog, I will give myself the honor of naming it.

I give you: Cowboy Sushi!

Ingredients:
6 large whole kosher dill pickles
3 packages Buddig Beef
1 package (8 oz) cream cheese, softened

Directions:
~Spread a thin layer of cream cheese over one slice of beef. Top with another slice of beef and spread cream cheese over the second layer.

~Roll the two slices of beef around one whole pickle.

~Repeat steps one and two so that the pickle ends up with four layers of beef and cream cheese.

~Slice the pickle into thick slices and serve cold.

~Repeat all the steps until all the pickles are covered.

If your family has something similar and you call it something else, please email me and let me know. One of the things I love about cooking is that every family and region has their own version of basic dishes. I get a feeling The Good Family is not the only one to enjoy this cowboy sushi.


recipe by: The Good Wife

Wednesday, September 10, 2008

Ingreident of the Week . . . Ground Beef

This week's ingredient is a basic staple in most kitchens, I would assume, save for my favorite veggie Annie. Ground beef is usually cheap if you get the full fat mix. We try to get lean ground beef so it is slightly healthier.

But what can you do with ground beef besides hamburgers and meatloaf? Well thanks to some uber-Christian, homeschooling, procreation friendly Southern family, the world has been introduced to Tater Tot Casserole (TTC). But in The Good Wife's house, we knew of this culinary delight long before the Duggars popped out number 1.

See, The Good Husband was raised by The Good Grandma. TGG is in her 80s and was raised during the Great Depression. So she knew how to eat on the cheap (as well as live on the cheap. You should hear her tell the story about how her Dad only made one dollar a week and because the fee for licence plates was .25, they had to drive on back roads and only go to town at night because they couldn't afford to pay the quarter). She also had 8 kids and had to feed a family on the cheap. Out of necessity TTC was born.

TTC, along with a collection of family recipes, was given to me when I got married. This version is "Sloppy TTC" since instead of using cream of mushroom soup with the ground beef, I used sloppy joe sauce.

"Sloppy" Tater Tot Casserole
Ingredients:
1 lb ground beef
1 lb ground turkey
Salt, pepper and grill seasoning to taste
1 15-ounce can tomato sauce
2 tablespoons brown sugar
1 tablespoon Worcestershire sauce
1 teaspoon chili powder
1/2 teaspoon onion powder
1/4 teaspoon garlic powder
1 can corn kernels
1 can cut green beans
1 medium bag tater tots
2 cups shredded cheese

Directions:
~Brown meat in a large skillet over medium high heat. Drain off fat and season with salt, pepper and grill seasoning.

~Add the tomato sauce, brown sugar, onion powder, garlic powder, chili powder and Worcestershire sauce. Cook until bubbly and thickened. Drain and add the can of corn and green beans.

~Pour mixture in the bottom of a 13x9 casserole dish. Layer the tater tots on top.

~Bake uncovered for 35 minutes at 425 degrees. Remove from oven, top with the cheese and bake for another 10 minutes.


recipe modified from: The Good Grandma

Now that the days are getting shorter and cooler, a big bowl of chili really hits the spot. For every person that cooks there is a different chili recipe. This is actually one TGH taught me and it never fails. It is simple and easy to make.

Chili
Ingredients:

2 lbs ground beef
1 tablespoon onion powder
1/2 tablespoon garlic powder
1 teaspoon dried oregano, crushed
1 teaspoon ground cumin
3 teaspoons chili powder
1 46 oz can V8 juice
1 can light red kidney beans
1 can dark red chili beans
1 small can mushrooms, sliced

Directions:
~Brown the beef in a large, deep stock pot. Drain off fat.

~Add all of the following ingredients. Do not drain the liquid off the beans or the mushrooms. Bring to a boil and simmer uncovered for 20 minutes.

~Serve with oyster crackers, cheese and/or sour cream.

recipe by: The Good Husband

Tuesday, September 9, 2008

Happy Birthday to Me Cookies

It's my birthday today so I made some cookies!

For me I made some chocolate chip pecan cookies and for The Good Husband, I made some peanut butter cookies. He needs some love too and I can never just make something for me only. And besides, nothing is more fun than making - and eating - fresh, warm cookies.


Chocolate Chip Pecan Cookies
Ingredients:
2 1/4 cups all-purpose flour
1 teaspoon baking soda
1 teaspoon salt
1 cup (2 sticks) butter, softened
3/4 cup granulated sugar
3/4 cup packed brown sugar
1 teaspoon vanilla extract
2 large eggs
2 cups (12-oz. pkg.) Semi-Sweet Chocolate Morsels
1 1/2 cup chopped pecans

Directions:
~Combine flour, baking soda and salt in small bowl. Beat butter, granulated sugar, brown sugar and vanilla extract in large mixer bowl until creamy. Add eggs, one at a time, beating well after each addition. Gradually beat in flour mixture. Stir in morsels and nuts. Drop by rounded tablespoon onto ungreased baking sheets.

~Bake at 375 degrees for 9 to 11 minutes or until golden brown. Cool on baking sheets for 2 minutes; remove to wire racks to cool completely.

recipe by: Nestle Toll House

Peanut Butter Cookies
Ingredients:
3/4 cup Creamy Peanut Butter
1/2 cup butter, softened
1 1/4 cups firmly packed light brown sugar
3 tablespoons milk
1 tablespoon vanilla
1 egg
1 3/4 cups all-purpose flour
3/4 teaspoon salt
3/4 teaspoon baking soda

Directions:
~Combine peanut butter, butter, light brown sugar, milk and vanilla in large bowl. Beat at medium speed of electric mixer until well blended. Add egg. Beat just until blended.

~Combine flour, salt and baking soda. Add to creamed mixture at low speed. Mix just until blended.

~Drop by heaping teaspoonfuls 2 inches apart onto ungreased baking sheet. Flatten slightly in crisscross pattern with tines of fork.

~Bake at 375ºF for 7 to 8 minutes or until set and just beginning to brown.

recipe by: JIF Peanut Butter

Monday, September 8, 2008

Meat and 'taters or How to Cook a Perfect Steak

The Good Husband is solidly a meat and 'taters guy. Before we lived together (yes, we lived in sin for about 3 years before we got married, *gasp*. Good thing we are both atheists LOL) I rarely ate meat or potatoes. My former life is a culinary shame since I was forced to either eat on the cheap (ramen noodles and hot dogs) or at restaurants.

Along with eggs and 'taters, meat and 'taters is one of those dishes that I had to learn to prefect over time. I still run into some bumps every now and then and I am trying my hand at different cuts of meat, but I think I have the overall concept down.

This beautiful plate is what we had for dinner on Sunday. I usually reserve Sunday for making meals that seem nicer. We do have mashed potatoes and steak during the week, but this gorgeous cut of New York Strip just screamed "Sunday Dinner" to me.


So, after years of practice and more than a few burnt steaks, I offer my tips for the perfect steak.

~First, make sure the steaks are room temperature. Let them sit out for at least 30 minutes before you cook them. This allows the fibers in the meat to relax so the meat won't curl up on you.

~Make sure your pan in hot, as in smoking hot. This does NOT mean, however, to have the heat on high. Place the pan on medium high heat and let it sit there for about ten minutes or until the pan really starts to smoke. On my stove, it is about a 7 on the dial. I like to use a cast iron pan, but a grill pan would be great as well. I have also used my hard anodized pan as well and it can create a great sear.

~Brush the steaks with oil (I use canola) and sprinkle with salt and pepper. Place the seasoned side down in the pan and season the other side.

~The steaks and the pan WILL SMOKE. Having a good exhaust fan will help get most of the smoke out. But if you are lacking a good fan, you might have to open the windows or risk setting off the smoke alarm, like I do every other time I cook steak.

This is the biggest point of contention in our house. TGH hates the amount of smoke I create when I make steaks. He was not used to having steaks cooked on the stove top and our lack of good ventilation drives him nuts. But a little suffering is worth it when he finally has a bite of good steak. So, just be prepared for a little smoke. It will clear out and you will be happy with the quality of your steak.

~Do NOT move your steaks once they are in the pan. By not moving them you allow for the meat to sear, trapping the juice inside. If you are using a grill pan, you will have great grill lines on the steak. Flip them over once. That is the only movement allowed.

Now, you can either cook the steaks completely on the stove top for finish them off in the oven. If you choose to finish them on the stove top, I would turn the heat down slightly and cook them for about 7 to 8 minutes per side for a nice medium rare. The steaks I used were about 1 1/2 inches thick, thicker than what I am used to. But they looked so good at the local butchers that I couldn't pass them up. Thanks Mr. Henry! So cooking time should increase about 1 minute per side.

Or you can finish them off in the oven. TGH likes this version better since it cuts down on the smoke in the house. Just preheat the oven to 350 degrees and cook the steaks for about 6 minutes for medium rare.

~Let the meat rest! Letting the meat rest - anywhere from 5 to 10 minutes - allows the juices to redistribute throughout the meat, making sure than when you cut into it, all the juices won't run out and the rest of the meat is bone dry. Also resting the meat allows you time to make a killer pan gravy from the drippings.

So with that lesson behind us, on to Sunday Dinner or Meat and 'taters.

1 recipe steak (see above) I used thick cut New York Strip
1 recipe mashed 'taters (following) with pan gravy (following)
1 veggie side dish (I used canned seasoned green beans)

Mashed 'Taters
Ingredients:
6 large red potatoes, scrubbed, skins on, rough cubed
3 tablespoons unsalted butter
8 oz sour cream
Splash of milk (optional)
Salt to taste

Directions:
~In large stockpot add potatoes and enough water to cover. Once the water boils, add 1 tablespoon salt.

~Reduce heat and simmer, covered 15 to 20 minutes or until fork tender.

~Drain and add potatoes back into the warm pot to evaporate any left over water.

~In mixing bowl mash the potatoes with a potato masher or electric mixer, breaking the potatoes into large pieces. Add 3 Tbsp. butter and continue to mash until all of the butter is melted.

~Add the sour cream and mash until all of the sour cream is incorporated and most of the lumps are broken up. If the potatoes are too thick, add a splash of milk. Add salt to taste. Serve with pan gravy.

Pan Gravy
Ingredients:
Pan drippings from steak
2 tablespoons butter
2 tablespoons flour
2 cups of beef stock
1 teaspoon onion powder
Salt and pepper to taste

Directions:
~Using the same pan you cooked the steaks in, place the skillet on medium low heat.

~Add the butter to the pan, allowing it to melt completely. Add the flour to the pan, and using a whisk, combine the flour and butter, cooking for 1 minute.

~In the meanwhile, combine the beef stock and the onion powder.

~Whisking continuously, add the beef stock slowly to the pan until the liquid and roux (the butter and flour mixture) is combined. Increase the heat and continue to whisk, making a figure eight pattern in the pan. This will prevent the gravy from both burning and clumping. Add the salt and pepper to taste.

Whisking and slowly pouring the beef stock is the key to lump free gravy. If you find you are have problems with making a lump free gravy, I suggest that you add only ONE cup of the beef stock at first and whisk to break up any lumps. Once the gravy is lump free, add the rest of the stock, careful to never stop whisking.

~When the gravy starts to bubble and there are no lumps, pour into a gravy boat and serve over mashed potatoes.

recipes by: The Good Wife

Sausage Pancake Sandwiches

Eggs and 'taters gets tiresome sometimes and pancakes are a good, easy solution to the eggs and 'taters blah. I normally like just pancakes covered in butter and syrup but every now and then I love a good sausage and pancake sandwich. I wish I could make some kind of lovely sausage pancake corndog like thing, but when I want breakfast I don't want to wait. Since I normally sleep in on Sunday, most of our breakfasts are technically bunch anyway, so the last thing I need is to fool around with some kind of pancake and sausage on a stick.

So in order to compromise between my desire to have breakfast on a stick and the hurried need to eat right away, I made sausage pancake sandwiches.

Ingredients:
1 3/4 cups all-purpose flour
2 tablespoons granulated sugar
1 tablespoon baking powder
1/4 teaspoon salt
1 egg, slightly beaten
1 1/2 cups milk
1 tablespoon vanilla extract
3 tablespoons cooking oil

Directions:
~In a large bowl combine flour, sugar, baking powder and salt.

~In another bowl combine egg, buttermilk, vanilla extract and oil.

~Add egg mixture all at once to flour mixture. Stir just until moistened (batter should be slightly lumpy).

~To make a pancake, ladle 3 tablespoons of the batter into a hot, greased griddle or large skillet. Cook over medium heat for 1 to 2 minutes or until bubbles form on the surface of the pancake. Flip the pancake over and cook for another 1 to 2 minutes.

To make the sandwiches:
~Layer one cooked sausage patty between two hot pancakes and top with a drizzle of syrup.

recipe modified from: Better Homes and Gardens

Friday, September 5, 2008

Napa Cabbage Salad

I first time had this salad at The Good Aunt's house. One bite and I fell in love. The salad was like nothing I had ever had before. The ramen noodles added a nice buttery crunch to the cool crisp cabbage. I had to get the recipe. Ingredients:
1 head napa cabbage
1 bunch minced green onions (I omitted the green onions)
1/3 cup butter
2 (3 ounce) packages ramen noodles, broken
2 tablespoons sesame seeds (I omitted sesame seeds but added 1/2 tablespoon sesame oil)
1 cup slivered almonds (I used sunflower seeds instead)
1/4 cup cider vinegar
3/4 cup vegetable oil
1/2 cup white sugar
2 tablespoons soy sauce

Directions:
~Shred the head of cabbage. Combine the green onions and cabbage in a large bowl, cover and refrigerate until ready to serve.

~Melt the butter in a large skillet over medium low heat. Mix the ramen noodles, sesame seeds and almonds into the pot with the melted butter. (I used just the noodles and sunflower seeds). DO NOT USE THE RAMEN SEASONING PACKET. Toast the noodles and seeds until the are golden brown, careful to not burn them. Stir frequently.

~In a small saucepan, heat vinegar, oil, sugar, and soy sauce (and sesame oil if using). Bring the mixture to a boil, let boil for 1 minute. Remove the pan from heat and let cool.

~Sprinkle the top of the salad with the noodle mixture and then pour the dressing over. Allow to sit for 15-30 minutes before serving. If you are not serving right away, then do not top the dressed salad with the noodle mixture or it will get soggy.

This is a nice light summer supper or a good side dish to Sweet and Sour Chicken or other Asian dish. I need to work on my shredding. The cabbage shreds were a little thick and I think I used too much of the white, ends of the Napa. But this salad hit the spot.

Thursday, September 4, 2008

Ingredient of the Week . . . Chicken

I know I took a break from the Ingredient of the Week but I promise that I am back on track! This week's ingredient is chicken.

One of my goals with this blog is to build on my cooking skills. Right now I am average, slightly above. I lack a lot of creative thinking in the kitchen and I am not that comfortable with anything above simple cooking. I hope that as this blog grows, so will my creativity in the kitchen. I hope to one day look back at these simple dishes and beam with pride with how much I have accomplished.

So I like to think of this early part of the blog as the foundation of my skills. These dishes are the ones I know how to make now and make with confidence. I hope they will provide for a great launching pad as I continue my experiments in the kitchen.

And now on to two simple chicken dishes.

We eat chicken at least once a week and if there is anything that can become boring and bland over time it is chicken. It is such a same too since I love chicken. I would raise chickens if I could, but those little bastards are mean when they are alive so I prefer to deal with them on my cutting board only.


Simple Chicken Pot Pie
Ingredients:
1 can refrigerated biscuits (yes, don't judge. The Good Husband hasn't been broken from his pre-made biscuit addiction)
1 large onion, chopped (I use onion powder, about 3 teaspoons)
3 stalks celery (leaves too), chopped
3 large carrots, chopped
2 large potatoes, cubed (I didn't have any potatoes this time and I was a little sad about that)
1 cup frozen corn
1 cup frozen green beans
1 cup frozen peas
2 tablespoons butter or margarine
1/3 cup all-purpose flour
1 teaspoon poultry seasoning
1/4 teaspoon salt
1/4 teaspoon black pepper
1 1/2 cups chicken broth
1 cup milk
2 1/2 cups chopped, cooked chicken

Directions:
~In a large saucepan cook onion (if using fresh), celery, carrots and potatoes in butter over medium heat for 4 to 5 minutes or until vegetables are tender. Stir in the flour, poultry seasoning, salt, and pepper, turning to coat the veggies. Now is the time to add the onion powder if you are using it. Add the chicken broth and the milk all at once. Cook and stir until thickened and bubbly. Stir in chicken, peas, green beans and peas. Pour into a 2-quart rectangular baking dish.

~Arrange biscuits over the top of the dish.

~Bake, uncovered, in a 400 degree F oven for 30 to 35 minutes or until crust is golden brown.

~Let stand for 20 minutes before serving.

This chicken pot pie recipe is loaded with veggies so it makes for a hearty meal. I also like to add a bit more flour to the sauce so that it will thicken up nicely. I hate watery gravies and sauces.

recipe modified from: Better Homes and Gardens


Popcorn Chicken
Ingredients:
2-3 cups flour
1 egg plus 1 egg yolk
1/2 cup milk
2 lbs chicken breasts (I use boneless, skinless for this)
salt
pepper
seasoned salt
canola oil

Directions:
~Cut chicken into bite size pieces. Sprinkle with salt, pepper and seasoned salt to taste. You can also add other seasonings such as rosemary, thyme or poultry seasoning.

~Combine the whole egg and egg yolk with the milk and mix to combine. Add the chicken and allow it to soak for 10-15 minutes.

~Shake off excess liquid and add the chicken, in small batches, to the flour, tossing to coat. (I use 2 large bowls for this).

~Drop chicken into hot (375 degree oil) and fry for 6 minutes per small batch. I like to use my deep fryer for this since I am scared to death to actually use a big pot of hot oil on the stove.

~Serve with honey mustard, hot sauce, blue cheese dressing, ranch dressing, BBQ sauce or ketchup.

recipe by: The Good Wife