Friday, March 30, 2012

How To Smell Like A Dirty Hippy

I try and live a green lifestyle by avoiding unnecessary chemicals in the things I eat and what I clean with and what I put on my body.

One of the questions I hear all the time is about natural or green deodorant choices.

People are terrified of being stinky. And I don't blame them. I don't want to stink and I certainly don't want to be around anyone that stinks either. But I also don't really want to smell like a dirty hippy. You know, that smell of patchouli and condescension? Who wants to smell like that? No one. And no amount of talk at the Farmer's Market will convince me it is a good smell, just like no one will ever convince me they actually like the taste of PBR.

A good dirty hippy shouldn't smell at all. That's not to say you won't be sweaty, because you will, but at least you won't stink.

Below are the brands of dirty hippy deodorant I have used and my thoughts on each.


The main difference between conventional deodorant and dirty hippy stuff is conventional stuff contains an antiperspirant. This makes your body stop producing sweat. However, since the main function of sweat is to clear your body, by blocking the sweat production from your armpits, you are just encouraging your body to produce sweat in other areas like your arms and face. So dry pits, but a soaked face. Or worse, swamp-ass.

Another big difference between dirty hippy stuff and conventional is conventional deodorant contains aluminum. Dirty hippies will tell you that aluminum will cause cancer but no science has proven that yet. I just don't like the idea of blocking my pores with aluminum, so I go the dirty hippy route.

So now that we know that I will sweat but hopefully not stink, how do these products really stack up?  You're worried that you will spend all this money on this stuff and end up a stinky, social outcast, aren't you? Well hopefully you won't.

The Crystal  - This was the first dirty hippy deodorant I tired. I paid around $7 with the claim it would last me a year. I believe I used it 8 months or so. You are supposed to "slightly moisten" it and then apply it. I never really knew what that meant, so I would run it under water for a second before applying it. It was weightless and scent free and for the most part I did not stink.

However, when I hit about 9 months pregnant around June of a hot as fuck summer, I thought I started to smell and I ended up switching to something conventional to get me through summer. I should note, however, that when I am pregnant, I acquire some freaky super sense of smell. I can smell the dirt outside my closed window and I constantly think I stink. I have The Good Husband smell me all the time and he says I don't. So I put the Crystal away until my body got back to normal. I still recommend this to anyone wanting to switch from conventional and I have heard great things about the roll on.

Tom's of Maine - This was the second dirty hippy stuff I tried. I love the smell - cucumber grapefruit and it glides on super easy and does not irritate my skin at all. However, I would consider this a winter deodorant since I don't think it would stand up to heavy sweating. I feel like stink issues might be more of a problem with this one. I think I paid around $6 for this and it has lasted me two winters. 

I couldn't actually find this product on the Tom's website, so they might not even make it anymore. If that is the case, I might try a new version once I run out of this in a few winters and see if the product has improved. I would recommend this to people that don't sweat a lot.

Burt's Bees - This was the last dirty hippy stuff I tried and so far it is the best at preventing odor. This is my spring and summer deodorant. I never think I smell when I wear this.

That is not to say this is without draw backs, b.c there are some. The biggest one is probably the smell. The Good Husband actually dislikes this. He says it makes me smell like a man. And with sage and lemon I probably do, compared to the sunshine and roses I normally smell like. But I don't notice the smell at the end of the day and TGH hasn't said anything lately, so it isn't that bad. Another big negative is this contains alcohol. Normally this isn't a huge deal but spray this stuff on after you shave your pits and you will be screaming like Macaulay in Home Alone. Not pretty.

I paid around $8 for this and it has lasted me going on two summers now. I feel like this is the best at preventing me from being BO stinky but now I am slightly man stinky. If you sweat a lot and are not put off by strong smells I would recommend this.

My plan is to continue to use all three of these until they run out and try two different versions of Tom's and the Crystal before going with Burt's Bees forever.

So I hope you learned something about dirty hippy deodorants and conquered your fear of being stinky.  Embrace your natural smell, but not too much since you still want an active social life. 

I was not paid for this post in any way. I bought all three of these products with my own money.

Wednesday, March 28, 2012

Homemade Seasoned and Italian Salt

I continued my tradition of making homemade gifts for Christmas again this year. Yes, it is almost April and I am talking about Christmas, but this photo got lost in the contents of my hard drive and I just now found it. Oops. 

This year, technically last year, I made a photo book of The Good Daughter to give to my parents and grandparents, along with homemade seasoned salt and Italian Salt. Both of these were super easy and quick to make and I have heard from my mom that she won't use store bought seasoned salt anymore.


In fact, I will probably never buy commercial seasoned salt again either, since this recipe is just so damn good. 


Homemade Seasoned Salt
Ingredients:
1/2 cup Kosher salt
1 tablespoon fresh ground pepper
1 tablespoon sugar
2 teaspoons paprika
2 teaspoons garlic powder
1 teaspoon onion powder
1 teaspoon ground red pepper 

Directions:
~Stir all ingredients together.

Makes a 1/2 pint jar.


Homemade Italian Salt
Ingredients:
1/2 cup Kosher salt
4 tablespoons oregano
4 tablespoons basil
4 tablespoons thyme
2 tablespoons onion powder
2 tablespoons garlic powder
1 tablespoon crushed red pepper flakes
1 tablespoon fresh ground black pepper

Directions:
 ~Stir all ingredients together.

Makes 2 jars, 1/2 pint each.

I will say the Italian Salt is a little on the salty side. I could see decreasing the salt by as much as half and the recipe would still be flavorful. It might actually make the salt more versatile since the salt flavor will not be the first thing you taste. Feel free to play around with the recipe.

recipe modified from: Eat at Home Cook 

Monday, March 26, 2012

Week 1 of the Weekly Organization Challenge

This is the first official post of The Good Wife's Weekly Organization Challenge! How did everyone do the first week? Survive?

In week 1, we tackled the kitchen drawers and kitchen cabinet organization. In the past I have talked about little things I have done to organize the kitchen, such as the utensil drawer, the kiddo cabinet, the spice rack, and pot and pan storage

I will confess that probably my biggest challenge is not having enough stuff to fill all the cabinets and I have a lot of wasted space. Oh, the first world problems I have.

But even if you have more stuff and less space, there are several organization principles I use to help organize the kitchen.

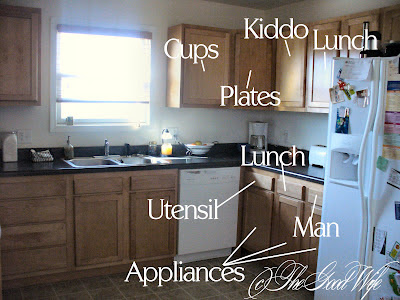
Let's start with a basic overview of my kitchen.


And now a breakdown of where everything is at.


Starting from the side closest to the pantry and working from the top cabinets I have:


My bake ware.  I chose this location (to the left of the stove) for the dishes since it is closest to the stove and it was the first cabinet large enough to hold all the dishes. This allows me to prep food on the counter below and then just grab a dish and put it in the oven. I like to group similar items together, so round and oval bake ware are together as are square and rectangle. I also like to have the lids on as much bake ware as possible, so it is easy to find and use.

Above the stove are rarely used items like all my vases.

Next to the stove on the right hand side, I have my food prep tools and bowls.


Lesser used items like my salad spinner and dressing maker are on the top shelf - both out of the way yet within easy reach. Next I have my food processor and shredder. Behind the shredder are the additional blades and the housing for the blades. On the bottom shelf are my mixing bowls and my hand mixer. I like this cabinet since it is compact and everything is neatly stored in here.

Next to this is the corner cabinet which contains serving dishes and larger cooking tools.


The top shelf holds my pampered chef mixing bowl and not much else. The second shelf contains my bread basket, serving trays and my trifle dish. I might eventually move this to the buffet in the dinning room but then what would I put in here? On the bottom shelf I have the tools I use the most - kitchen aid stand mixer attachments, strainers and colanders and my mandolin that likes to try and kill me.

Next cabinet holds all my food storage. Tupperware containers live here along with my glass containers.

Moving to the other side of the side of the window and way from the cooking tools we have the eating stuffs.


Directly above the dishwasher is the cabinet for dishes. This contains our everyday drinking glasses, which we need to replace, as well as coffee mugs and travel mugs. I also like to keep our most used medicines in this cabinet for ease of access.

In the corner cabinet I have our plates and bowls and some miscellaneous mason jars. This cabinet is home to the plates since it has more room than the cabinet with the cups. The reason being, just like with items you use the most when cooking and keeping them next to the stove, you want to keep the items that you will unload from your dishwasher close by.

Now the annoying thing about my kitchen is that with the dishwasher open, I am too short to actually reach from the dishwasher and into the cabinets where everything goes. So I have to set everything on the counter, shut the dishwasher door and then put the stuff away. Again, such a first world problem.

Next to the dishes is the kiddo cabinet.


The next cabinet is the lunch command center.


This is another double cabinet that has tons of storage. It is also right next to the fridge and above my other lunch command center drawer (which you will see in just a second). When I pack lunches at night, I can easily get food out of the fridge, set them on the counter under the cabinet and prep. This cabinet holds all the food I use to make lunches - The Good Husband's canned fruit, peanut butter, bread, etc., as well as a snack station for The Good Daughter. The cabinet is also home to the containers I use the most of lunches, as well as cookbooks I don't use all that much and TGH's lunch bag.

Now starting with the bottom cabinets next to the pantry.


This drawer is next to the phone and is the minioffice of the kitchen. I wish I had one of those nice fancy kitchens that has a little desk in it but I don't. I have to make due with this drawer. This houses copies of the phone book, pens, pencils and a pencil sharpener, along with a ruler and note pads. I also keep envelopes for mail in this drawer, along with scissors, glue sticks and a calculator.


Next to the minioffice, is my cutting board and pot pad drawer. Again, this is next to the stove for ease of access.


Under the two drawers is the pot and pan cabinet.


On the right side of the stove is the utensil drawer.

Below that is the cabinet with the cookie sheets. This cabinet needs an organization intervention which I will do soon.

Next are the only deep drawers I have in the kitchen. The top one is the shallowest and it holds my foil, wax paper and plastic wrap along with my dish rags and towels.


Below this is more food storage that needs to be organized desperately.

Next is the spice drawer. I have updated it since the last time I talked about it. I have added more jars and moved the sugar jars out of here and into the pantry.


The bottom drawer holds my baking tools and decorations. Cookie cutters, sprinkles, cupcake wrappers live in here and hide from the camera.

Next is the stuff I keep under the sink.


This is home to my cleaning supplies, as well as trash can for kitchen rags, trash bags and compost bucket.

Next to the dishwasher is the silverware drawer. Originally I had a metal silverware tray that looked beautiful but had some serious functionality issues. The dividers separating the silverware had a small gap, so the knives would end up sliding under the dividers and would get stuck. So back to Target it went and I got this nice bamboo tray instead. This keeps all the silverware separate and allows me room for knives, forks, spoons, serving spoons as well as miscellaneous silverware a the top. This drawer does need some organization help. More on that soon. 


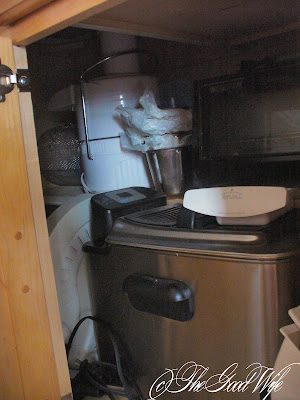
Below the silverware is the cabinet for large cooking appliances. This contains (way in the back) an electric griddle, our rotisserie and our fryer. On the shelf in the back are the accessories to the rotisserie, a juicer, our toaster oven and the shredder attachment to my kitchen aid stand mixer.


The next drawer, directly under the lunch station cabinet, is the lunch station drawer. This containers freezer and storage bags and chip clips. I eventually want to get rid of these altogether for something more earth friendly.


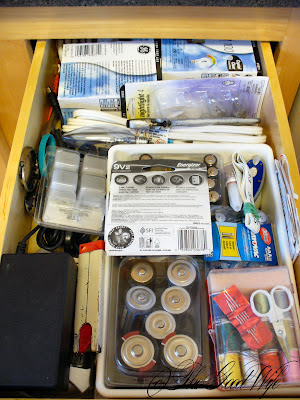
The next drawer is the man drawer. This houses light bulbs, tools and a shitton of batteries. I also have the charger for our rechargeable batteries in here as well as a sewing kit.


And finally, the last cabinet, below the lunch station drawer and the man drawer, is my other appliance cabinet. In it lives the blender, the waffle iron, the crockpots, the indoor grill and our pitchers.


So there you have it. The tour of The Good Wife's kitchen cabinets and drawers. I hope you learned some new organization ideas (group like with like, keep the things you use the most with the stove next to it, same for the dishwasher) that will help you create a more functional kitchen.

Next week, we will  organize the counters (another huge problem for me) and the sink. Happy organizing!

Organize along with me in The Good Wife's Weekly Organization Challenges

Monday, March 19, 2012

BotO - Medical Logs

Since I am knocked up now and have a walking germ collector otherwise known as The Good Daughter, I see the doctor on a fairly regular basis. We also tend to take a lot of medicines in The Good Household. That is mainly due to the fact that The Good Husband is a big baby when it comes to illness while TGD and I just shake things off.

Also, breeding tends to create a lot of paperwork for insurance claims and by the time I remember to call the doctor's office to get the dates of my visit, the office is closed and the paperwork is due to the HR department in the morning. So I have created several templates that will help you track your doctor visits, healthcare costs and medicine taking.

This first template allows you to track your healthcare spending. This is great if you use a health savings account. I actually don't know what the hell that is, and just use it submit reimbursement claims to insurance. It tracks the date and description of the service, as well as the total, the payee and if the claim was submitted to one of the fancy HSA thingies or insurance.


Next is the medication log. This is helpful since it allows you to see what types of medication you take over a course of time and if there were any reactions. We have been lucky in that TGD has only ever had two ear infections and has otherwise never been sick. By having a list of the antibiotics she has taken in the past, we know that she has never had a reaction to any of them (unlike, say, her Momma) and we can tell the doctors there have been no issues. 

This template tracks the dates started and stopped for any medication, along with the name, side effects and notes. In the name field, I like to list both the medical name and the type. In the notes field, I list the reason for the medicine, ie, allergies, infection, etc. 


This last template allows you to track doctor visits. I like to have one for each doctor and patient. So for me, I have my primary care physician, my OBGYN, my eye doctor, my endocrinologist and such. Luckily, TGD has only seen her pedi and an eye doctor, so she has the smallest stack of forms. She does rival me in doctor visits, since who knew "well babies" had to see the doc so much and get so many shots?

The template includes the contact info for the doctor as well as the date and type of the visit. I have also included the amount of the co-pay, the overall cost and a space to mark the visit as paid. 


You can now get these printables and more in my Etsy Shop! 

The Medical Logs are now part of The Health and Fitness Pack and The Good Wife Home Management Pack. You can also get CUSTOMIZED printables too!

Monday, March 12, 2012

Weekly Organization Challenges Complete List

I know I should have started a 52 week organization challenge way back in January but here's the deal: I hate winter and I think it is stupid to start any new challenges in the middle of the most depressing time of the year. I know not everyone lives in a dark, cold, barren, wasteland in winter but I do. And it sucks. And the last thing I want to do is clean or lose weight or resolve to be a better person. All I want to do is eat and hibernate and watch The Walking Dead and Mad Men and American's Next Top Model.

So I consider the year to be officially started once we get out of the dead season and start the rebirth - Spring!

Spring is a great place for me to start since I usually do my big yearly spring clean in March and I am encouraged by all the new growth and flowers and sunshine around me. Plus this year I will have to begin for the arrival of The Good Baby. I know nesting instincts will kick in at some point.

So I have made a list of weekly organizational challenges, organized by room, to help me get and stay organized. I realize that I am an insane person to take this on considering I will have a newborn sometime in the middle of this project, but that's just the type of nonmedicated person I am. But please don't roast me over the coals if I fail one or two of them.

And with that disclaimer, let's take a look at the list. Feel free to challenge yourself along with me!

Kitchen March 19 - May 27
Week 2. Kitchen organization: counter tops and sink
Week 3. Organize pantry, spices and food storage areas
Week 4. Organizing refrigerator
Week 5. Organizing freezer
Week 6. Organize recipes and cookbooks
Week 7. Organize coupons
Week 8. Meal planning/grocery shopping
Week 9. Create a home recycling center (plus dealing with trash)
Week 10. Cleaning supplies

Dining Room May 28 - June 10
Week 11. Dining room/kitchen eating area
Week 12. Homework area/launching pad  

Living Room June 11 - July 22
Week 13. Living room/family room
Week 14. Entryway/mud room
Week 15. Coat Closet
Week 16. Magazines and newspapers
Week 17. CDs and DVDs
Week 18. Photos

Laundry Room July 23 - August 12
Week 19. Laundry room
Week 20. Laundry baskets and hampers
Week 21. Linen closet

Bathroom  August 13 - September 9
Week 22. Bathroom
Week 23. Medicine cabinet
Week 24. First Aid
Week 25. Makeup/cosmetics    ~Organization update~

Bedroom September 10 - October 21
Week 26. Master bedroom
Week 27. Master bedroom closet
Week 28. Seasonal clothing switch
Week 29. Shoes
Week 30. Jewelry/accessories
Week 31. Purses/briefcases

Kid’s Room October 22 - November 18
Week 32. Kids' bedroom
Week 33. Books
Week 34. Kids' closet
Week 35. Toys and games ~Organization Update~

Home Office November 19 - February 3, 2013
Week 36. Home office
Week 37. Mail
Week 38. Bill paying
Week 39. Receipts/tax documents
Week 40. Filing system
Week 41. Email and internet passwords, manuals and warranties
Week 42. Addresses/contact information
Week 43. Create personal home inventory
Week 44. Crafts
Week 45. Keep a family calendar
Week 46. Organize wrapping paper and gift bags

Basement February 4 - February 17
Week 47. Christmas decoration
Week 48. Zombie Kit

Garage February 18 - March 10
Week 49. Vehicles
Week 50. Garage
Week 51. Pets

Exterior and Lawn/Garden March 11 - March 17
Week 52. Yard/garden


Thursday, March 8, 2012

BotO - Bill Tracker

This is another template I created for my Brains of the Operation, aka Household Binder.

I created this bill tracker as a way to keep a record of our monthly expenses. I already have a monthly budget but this allows me to see monthly expenses for the entire year on one single piece of paper. It is very helpful for me since we do a lot of business expense write off stuff at tax time.

I was always gathering the paperwork in February and cursing myself for not writing everything down once a month over the course of a year as opposed to waiting until the last minute to get everything together.


Having your monthly expenses listed on a single page is also a great way to see how your utilities average out over the year. Is your heating bill really high in December and January like ours tends to be? There are some tips you can try to help reduce your costs, like installing a programmable thermostat.


You can now get this printable and more in my Etsy Shop!

 The Budget Checklists includes the Bill Tracker are now part of The Budget Pack and The Good Wife Home Management Pack. You can also get CUSTOMIZED printables too!

Friday, March 2, 2012

Hotdog Cupcakes

The Good Daughter loves hot dogs. I blame The Good Husband. It all started after he took her to the hardware store with him and they just happened to have a hot dog stand there. Now it's all she wants to eat.

I made this one night when TGH and I were having lamb kabobs for dinner. Unsure if TGD would eat lamb, I made these as her meat option. Needless to say, she gobbled these down and half my lamb.

At first these little guys look just like a regular cornbread muffin but... 


cut them open and see the hot dogs. 


TGD went nuts over these. She kept calling them her hotdog cupcakes.

They were super simple to make and keep well for leftovers the next day.

Ingredients: 
1 cup all purpose flour 
1 cup cornmeal 
1 tablespoon baking powder 
2 eggs 
1 cup milk 
1/3 cup unsweetened applesauce or oil
1/4 cup sugar 
1/4 teaspoon salt 
1/2 teaspoon onion powder 
1/4 teaspoon garlic powder 
6 hot dogs, cut into 4 pieces  

Directions: 
~Heat oven to 400 degrees F.

~In a large mixing bowl mix together flour, cornmeal, salt, and baking powder until combines. In a separate bowl whisk together eggs, milk, applesauce and sugar. Combine wet and dry ingredients, careful not to over mix. 

~Pour batter into lined or oiled muffin cups, filling 3/4 of the way full. Insert two pieces of hot dog and spread batter over top to cover. 

~Bake for 15 minutes or until a toothpick inserted in the middle of a muffin comes out clean Remove from pan and allow to cool on a wire rack. Serve warm.

recipe adapted from: Happy Good Time Blog found via Pinterest